
Is the AeroPress Go the Best Coffee Maker for Travel & Camping?
Articles on this site contain affiliate links, meaning I may be compensated if you buy a product or service after clicking them. The full privacy & disclosure policy is here.For the longest time, I didn’t travel with a way of making coffee. If I wanted my morning caffeine hit, I’d walk to the nearest cafe if there was one, or put up with whatever sock-flavored dishwater was on offer in my hotel room if not.
Eventually, though, I became a massive coffee snob realised that I could almost always make a better cup myself than what was on offer nearby, and didn’t need much in the way of equipment to do it.
Likewise when it came to camping: where I once just threw a few sachets of instant coffee into my backpack and accepted the grimaces that came with drinking it, investing a small amount of money and effort yields such a better outcome.
I’ve experimented with all kinds of different portable coffee makers for the last couple of years, whether I’m hiking for a few days in the back country, heading away for a long weekend, or embarking on multi-month round-the-world trip.
Today, I’m looking specifically at my pick of the bunch, the AeroPress Go. What’s so good about it, and why has it become my go-to choice for making tasty coffees almost anywhere?
What’s in the Box?

My Go came in a colorful cardboard box, emblazoned with the slogan “Find Your Inner Brew”. I’m uncertain what that actually means, but as soon as I figure it out, I’ll be sure to let you know.
Inside was the Go itself, with all of the accessories packed inside it, and a fold-out set of instructions telling me how to grind and brew various different styles of coffee. I’d suggest ignoring all of them and using James Hoffman’s Aeropress recipe instead.
It’s a personal decision, of course–I’m not going to tell you how to make your coffee–but after a bunch of experimentation, it’s the one I’ve found the easiest to get consistently right when I’m traveling, with the least effort.
Anyway, other than those ignorable instructions, you’ll get:
- AeroPress Go brewer, plunger, and filter cover
- Filter holder
- 100 filters
- Shatterproof cup
- Silicone lid
- Coffee scoop
- Fold-up stirrer
If you’ve ever seen an Aeropress before, the Go will look pretty familiar. It’s a bit shorter than the original, and the base isn’t as wide, but it otherwise looks much the same: a plastic chamber, a filter cap that screws on the bottom, and a plunger that goes in the top.
Some models of Aeropress now come in transparent and colorful versions as well as the traditional opaque grey, but for now, the base Go model isn’t one of them.
If you prefer a different look, there’s a transparent No products found. that swaps the mug for a travel tumbler: it costs more, but looks nicer and for some people the tumbler will work better than the standard mug.
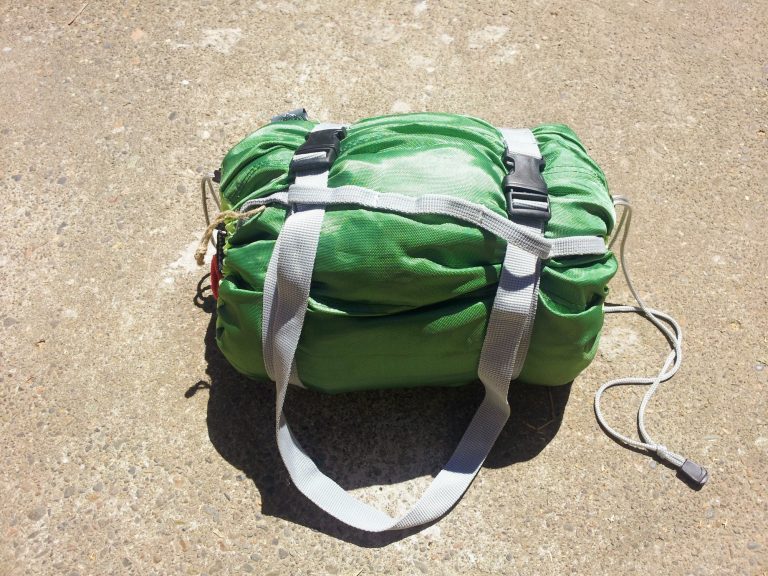
The party trick of the Go, of course, is the way everything fits inside the cup in a compact, travel-friendly package. The silicon lid seals tightly enough on top to keep it all together, even when the Go has been bouncing around in my backpack for hours.
A Quick Look at the Accessories
The biggest difference between the AeroPress Go and the other products in the range is the accessories it comes with. Let’s start by looking at the mug.

It’s not exactly beautiful, the ridged, shatterproof plastic making it look more like something you’d give your toddler to drink from than a vessel for your favorite Guatemalan specialty coffee.
That said, the flared lip of the mug is quite thin and nicely rounded, so it feels better to drink from than you might expect. The wide, square base also keeps it nice and stable on uneven ground and wobbly tables, which never seem to be in short supply.
At 14oz (400ml), it has plenty of capacity for holding other types of drinks: I often use it to dissolve a Berocca or other energy/vitamin tablet in when I’m camping.

The scoop that comes with some of the other models of AeroPress has an almost comically-long handle: I’m pleased to say this one is a much more sensible size for travel. Likewise, it has enough capacity, at least for the type of coffee I make, without being excessively large.
The stirrer is a nice piece of design, folding up so it fits inside the brewer when you’re not using it, but long enough to reach to the bottom when you are. The slim filter holder is a welcome addition, keeping the paper filters clean and dry while traveling. It holds about 15 filters easily, 20 if you force it closed.
How Do You Make Coffee With It?

For such a simple piece of equipment, there are a remarkable number of ways to make coffee with it. From strong, vaguely espresso-like shots to smooth pourover-style brews and most things in between, it’s all possible with a plastic tube and plunger.
I tried a few different methods before settling on the one I mention above: like I say, it’s been hard to mess up, delivering consistently good coffee with a minimum of effort. At a basic level, all you need to do is:
- stick a filter in the filter cap and screw it onto the bottom of the Go
- put the Go on top of its mug, or any other cup that it comfortably fits onto
- dump a scoop of ground coffee in the top, then add 200ml of nearly-boiling water
- insert the plunger half an inch or so inside the top to create a vacuum
- wait two minutes, swirl everything round a bit, wait another thirty seconds
- slowly press the plunger down to the bottom, then remove the Go and take off the filter cap
- press the plunger down hard to pop the coffee and filter into the garbage
- drink your delicious coffee
- rinse off the equipment, and you’re done
Just because it’s designed for travel doesn’t mean that’s the only time you can use the Go. It works just fine as an everyday coffee maker at home; indeed, that’s how I’ve been using it every morning for the last week as I write up this review.
What’s It Like to Use While Traveling?

At home, I have a small set of scales to weigh the amount of coffee I’m about to grind and how much water goes into the brewer. I don’t take a grinder or scales with me when I’m traveling, so need to use a different approach. It’s not as precise, but it seems to work.
Depending on where I’m going, I either pre-grind a bag of coffee at home, or seek out a place selling decent beans when I arrive and ask them to grind for Aeropress (medium-fine).
At that grind setting, the scoop that comes with the Go fits about 11g (levelled off), which means I need to add about 200ml of water. Conveniently, that’s almost exactly at the top of the “3” circle on the AeroPress brew chamber, so it’s very easy to eyeball.
The entire kit weighs 11.5oz (327g), which is fine when I’m traveling with a checked bag, but a bit much for carry-on-only trips with strict baggage allowances.
In that case, I only pack the brewer and plunger, filter cap, scoop, and a handful of filters inside their case, which drops the total weight down to 6.4oz (182g). Of course, neither of those amounts include the coffee itself.
What’s It Like to Use While Camping?

There aren’t a lot of differences about how I use the AeroPress Go for travel and how I use it while camping, but there are a couple.
I pre-grind enough coffee to make two cups a day for however long I’ll be away for, then put it into an old, resealable 8oz coffee bag that I keep around for this purpose. That goes into a plastic screw-top jar, along with a spare Ziplock bag for used grounds and filters.
This helps keep everything safe and secure in my backpack, and helps avoid coffee smells from attracting unwanted visitors to the campsite.
Since there aren’t typically a lot of spare cups sitting around in the back country, I pack pretty much the full AeroPress Go kit when I’m camping. The stirrer isn’t strictly necessary for the way I make my coffee, but everything else comes with me.

The hole at the top of the Go is wide enough that I can usually manage to pour water into it from a saucepan without it splashing all over me, but I generally boil water in a camp kettle anyway.
I like the fact that everything just needs a quick rinse at the end: there isn’t always water available at my campsites, so only having to use a small amount (and no detergent!) makes a big difference.
All of the parts dry quickly, but even if they’re still a bit damp when it’s time to head out, they’re tucked safely away inside the mug so they don’t affect anything else in my pack.
Is It Worth Buying a Metal or Cloth Filter?
Before I bought my first AeroPress, I assumed that I’d use the paper filters when I was at home and switch to a metal version for travel and camping. Less space in my bag, less waste to deal with: what’s not to like?
“The taste”, apparently, is the answer to that question.
I’ve tried a couple of different metal filters, both the official AeroPress one and a third-party model that had better reviews. They both let far more water through than the paper versions, even when I ground the beans much finer than usual.
Even after a lot of experimentation, the end result was a less-enjoyable cup of coffee and noticeable sediment in the bottom of the cup. I’m not saying there isn’t a metal filter out there that doesn’t have these issues, but I haven’t found it yet.
I could use the inverted brewing method, a common AeroPress hack that prevents water from flowing through the filter before you’re ready. It really needs a flatter surface than I typically have at a campsite, however, and doesn’t do much for the sediment issue.
I’m also a little concerned about how flimsy the metal filters are: they need quite careful handling to avoid bending, something I can’t really guarantee away from home!
I also considered a cloth filter, which sounded like the perfect compromise between paper and metal. That’s right up until I realized that you need to keep it submerged in water in your fridge whenever you’re not using it to avoid it going rancid and/or moldy. That’s not ideal for travel, and even less so for camping!
I wish I’d had a better experience with these filters, so that I could at least use them while camping to reduce the amount of waste I need to pack out with me. Alas, at least until I find one that does as good a job as the paper version, it’s not to be.
On the upside, since you can force around 20 paper filters into the plastic case, that covers most of the shorter trips I take. If I’m away for more than a couple of weeks, I just throw a sealed pack of 100 filters into my bag; they really don’t add much extra weight.
Get regular travel, hiking, and tech updates from me
News, reviews, guides, and more, from here and around the web
Aeropress Go Vs Aeropress Original

While the Go is very much the travel-focused product in the AeroPress range, it’s not the only one that fits in your carry-on. Before buying the Go, I took the original model with me on most trips for a couple of years, from overnight stays to months-long international journeys.
It’s worked well, and like the Go, feels pretty much bulletproof: despite regular abuse from both me and baggage handlers the world over, there’s barely a mark on it.
The Original has the advantage of a larger ten-ounce (296 ml) brewing chamber, vs the eight ounces (236 ml) of the Go. The plunger means you can’t use the full capacity in either case, so if you prefer a coffee over about 7oz (200 ml), the Original will do a better job of it.
You can brew stronger and dilute with more hot water later if you want to: that works if you only want a slightly larger cup, but beyond that, has a negative effect on how well the coffee gets extracted. The taste difference is relatively subtle, but it’s there.
That’s the only (minor) downside of the Go, though, and I find the upsides easily outweigh it when I’m traveling.
For instance:
- It’s amazing how many hotel cups are the wrong size to balance an Aeropress, or are too delicate to risk pushing the plunger down on. Having a mug with me that’s the right size and shape eliminates that issue.
- The Go accessories are designed for travel, from the fold-up stirrer to the smaller scoop and slimline filter case. With the Original, I ended up leaving all the accessories at home and having to make do with whatever third-rate alternative I could find at my hotel. Not having dirty, wrinkled filter papers is a definite win.
- Speaking of the accessories, the fact that they all fit inside the mug makes them much easier to pack, especially when I’m traveling carry-on only and space is tight. That wasn’t an option with the Original: another reason why I left them at home!
- The smaller brewer unsurprisingly weighs slightly less. Adding the mug and accessories makes the Go weigh more overall, of course, but then you also get a more useful setup to go with it.
Final Thoughts
If you’ve got the original AeroPress already and are happy with it, I wouldn’t necessarily suggest going out and buying the Go unless you know you’ve got a lot of travel or camping coming up.
If you don’t already own an AeroPress, however, and are trying to decide between the original and the Go, I’d honestly suggest the latter.
Other than brewing a slightly larger coffee, there’s nothing the smaller version can’t do just as well as the original, you get more (and more useful) accessories with it, and it’s a much better setup for whenever you’re away from home.
Inexpensive, versatile, and reliable, it’s simply a great way of making good coffee no matter where in the world you are. I’m off on a three-month trip in a few days, and of all the various ways I have of making coffee at home, this is the one that’s coming with me!
Buy on AmazonAll images via author


I like the slightly larger brew size, and, more importantly, bringing my own grinder for freshness and so I can buy whole beans from local roasters where I travel.
I’ve made what I consider the most refined travel kit for someone with my priorities;
-standard Aeropress
-titanium double wall mug (300ml boundless voyage)
-1zpresso Q Air grinder (fits inside AP plunger)
-small scale with timer
-golf ball mesh bag (8.1*5.7 in) everything fits inside and can breathe/dry if left a little damp
Yeah I definitely go backward and forwards on the grinder and scales — I really miss them when I’m on the road (and the coffee quality suffers), but I’m often traveling carry-on and just can’t justify the extra weight. Whenever I’m on a road trip or otherwise don’t have to care so much about size and weight, they’re one of the first things in my bag. 🙂
I’ve been keeping an eye on the Q Air recently, actually, ever since I saw somebody else mention that it fitted inside their plunger. Maybe that’ll be a Xmas gift to myself!
Thanks for the review, I fancy one of these for camping + a travel grinder similar to folding fireboxes one for the aeropress less the import fees from Utah though – any suggestions please?
I’d suggest something like the 1Zpresso Q Air – it’s a great little travel-sized grinder that fits inside the Aeropress Go plunger (albeit sticking out the top), has good components, and is made by a reputable brand yet doesn’t cost a fortune (by the standards of decent grinders, anyway!)
You don’t say where you live – I’ll assume the UK or Europe, so this is an Amazon UK link, but you should be able to find it without import fees in most places that Amazon has a store.