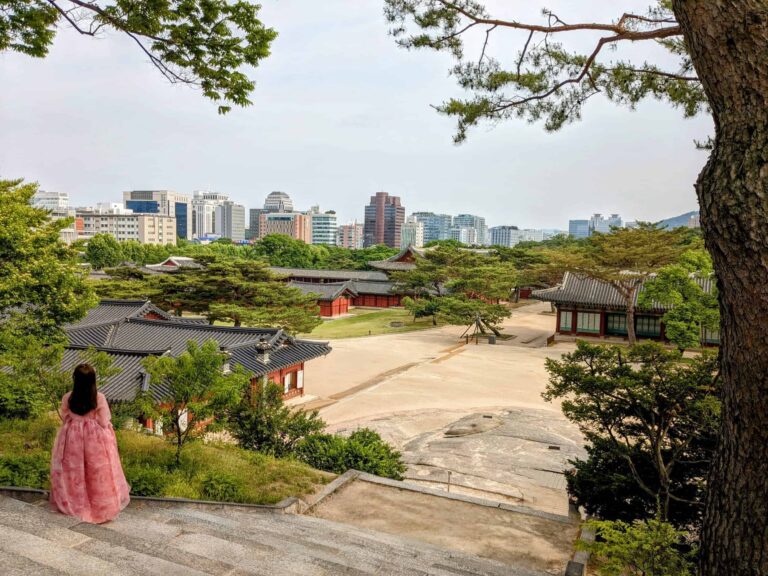
The Ultimate Guide to Visiting Seoraksan National Park
Articles on this site contain affiliate links, meaning I may be compensated if you buy a product or service after clicking them. The full privacy & disclosure policy is here.Seoraksan National Park, in the northeast of Korea, is a stunning national park with plenty on offer for a wide range of visitors. I didn’t know a lot about it before I arrived, but by the time I left a couple of days later, it was firmly entrenched as one of my favourite places in the country.
It’s a godsend for anyone who likes to put one foot in front of the other, with several spectacular day hikes that in a couple of hours can take you to the tops of rocky mountain peaks, alongside beautiful tranquil streams, and past delightful tumbling waterfalls.
If you’re not so big on walking, never fear: there’s a cable car that can whisk you to the top of a nearby mountain for dramatic views without the workout. Ancient temples, giant statues, and even some surprisingly good places to eat and drink: what’s not to like?
A delight in any season, Seoraksan is in a league of its own in autumn, when the leaves change colour and a sea of yellow and red blankets the park.
I struggled to find good, up-to-date information on the park when I started to research it, though, especially logistical things like how to get there from Seoul or the best day hikes to do while I was there. Having now worked all that stuff out, I figured it was worth putting a guide together to help others who find themselves in the same situation.
To that end, I’ve put down everything I could think of about transport options (including tours), which hikes are worth doing and why, where to stay, eat, and drink during your time in Seoraksan, how to deal with things like cable car tickets, and much more.
I really did love my time in the park, and hopefully this guide helps you enjoy it just as much as I did. Let’s get into it.
Seoraksan is part of my itinerary for first-time visitors to South Korea, which includes detailed day-by-day recommendations, food, drink, and accommodation suggestions, and downloadable PDFs to use on the go. If you’re planning a trip to this great country, be sure to check it out!
How to Get There
I wrote a long old guide about how to get to Seoraksan National Park, and I’d recommend checking it out to get all of the details you need. In brief, though, you’ve got three choices: public transport, driving yourself, or taking a tour.
Unless you already happen to be staying in a nearby city, you’ll likely end up heading to the main (Sogongwon Park) entrance, starting from or going through Seoul to get there.
There are no trains that run to the national park or to Sokcho, the nearest city: while you can combine train and bus options to do it, it’s faster, cheaper, and easier to just take a bus the whole way.
Buses run every half-hour or so between Seoul and Sokcho, from two different terminals. For most people, Seoul Express terminal is the better option: there are more buses, they’re a little cheaper, and they arrive at a more convenient terminal in Sokcho as well.
From there, you need to catch a local bus (route 7 or 7-1) to the park entrance. That bus also runs roughly every half-hour, and takes 30 minutes to get from the Express terminal to the park. It’s most convenient to use T-Money to buy your ticket, but you can pay in cash if you need to.
Driving yourself is pretty straightforward, at least if you have your own car or are planning to rent one. It takes about two hours to drive the 200km, mostly on the expressway. This is a toll road, so make sure you check with the rental company about how toll payments work if necessary.
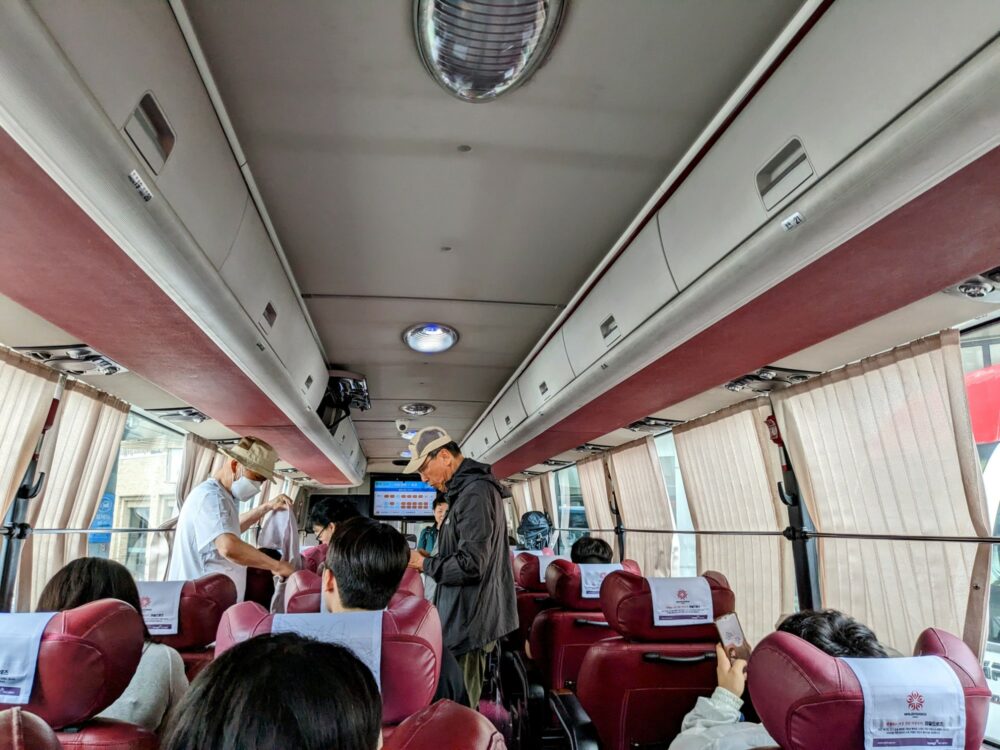
Finally, several companies run full-day trips from Seoul to Seoraksan National Park, with a range of itinerary options. Most stop at one or two other attractions along the way, and all give you several hours to walk in the park, either on your own or with a guide. It’s a good way of getting to see the biggest highlights of Seoraksan without having to deal with any of the logistics yourself.
Park Opening Hours

Seoraksan National Park is open from 6am until 8pm each day, year round.
Note that the cable car up to Gwongeumseong Fortress operates on a different schedule, which varies by day and season. As a rough guide, it operates from approximately 8:30am to 5:30pm, but check the website (Korean) for the current times. It also closes for maintenance and in strong winds: these are announced on the site as well.
Best Time of Year to Visit
Like the rest of the country, there are big differences between the seasons in Seoraksan, so timing is important.
If hiking is your main reason for going to the park, try to visit in spring (March to May) or autumn (September to November). This is when the weather is best, with less rainfall and relatively mild temperatures. Things can get pretty hot in summer, and likewise snow and freezing conditions are common in winter.
Spring is particularly lovely, with all the plants starting to bloom and plenty of birds and other wildlife around. Likewise, the stunning colours and cool, crisp temperatures of autumn make for delightful hiking conditions.
Note that the high-altitude trails are closed for much of spring due to snow, generally reopening in mid-May. This doesn’t affect any of the shorter trails in this guide unless you’re planning to continue on beyond Biseondae Rock: more on that below.
The autumn foliage acts as a magnet for domestic tourists, meaning the park can get extremely busy at this time of year. Buses and accommodation are often full, especially at weekends, and crowds on the popular trails can make the experience pretty unpleasant at times.
October is the busiest time of year in the park, thanks to both the changing colours and a number of public holidays falling during that month. Given the difficulties around securing transport and accommodation, I’d recommend taking a day tour instead during this period.
The upside of visiting in winter is that you’ll have few other people to worry about, and the snow-covered mountains, crisp, clear air, and frozen rivers and waterfalls make for stunning photos. The downside, of course, is that hiking becomes much more difficult, especially at higher elevations, and it can get very cold.
Make sure you’ve got appropriate gear for the conditions, and be aware that trails are often closed due to snow or bad weather.
You’ll have the opposite problem in summer, with temperatures in the park often hitting in excess of 30 degrees Celsius (86F). It’s when the mountain slopes are at their greenest, thanks to most of the rain falling at this time of year: you’ll get pretty photos, but be sure to pack plenty of water and sun protection if you’re hiking.
How Long to Spend at Seoraksan
Seoraksan National Park is hardly a secret for locals, but feels like somewhere that most foreign tourists don’t know as much about. It’s often left out of travel itineraries entirely; when it’s not, people usually only give themselves a single day to explore the park.
While you can cherry-pick the highlights of the park in a day (especially if you drive or take a tour, and leave early), you’ll have a better, more relaxed experience if you stay longer. We gave ourselves two days and two nights, and it felt like the right length of time, especially since we were using buses to get around.

That gave us an afternoon in the park when we first arrived, and a full day the next day, before returning to Seoul the following morning. As well as getting to see more of the park, including some of the less popular trails, that extra time came with another benefit: working around the weather.
Seoraksan is notorious for having, shall we say, some pretty variable weather. Rain and cloud are common, even when other parts of the country are bathed in sunshine. Our first afternoon was quite overcast: although we got patches of sun here and there, most of my photos were taken under grey skies.
If that had been the only time we’d had in the park, I’d have been pretty sad about it: those majestic mountains and sweeping vistas just aren’t as impressive when they’re covered in a thick layer of cloud!
Fortunately, the next day couldn’t have been more different: some light morning fog burned off as we arrived, leaving just blue skies and bright sunshine in its wake. It stayed like that all day, only starting to cloud over again as we were making our way back out of the park many hours later. Success!
Where to Stay
If you’re visiting for longer than a day, you’ve got two choices about where to stay: in Sokcho, or somewhere along the road that leads to the park.
The closest accommodation to the entrance is the four-star Kensington Hotel, less than a five minute walk from the main gate. Full of British memorabilia (including a double-decker red bus in the parking lot, believe it or not), it’s a popular spot with Korean celebrities. There are two restaurants, a bar, and cafe onsite, and while the rooms could do with a bit of a facelift, you can’t do any better in terms of convenience.
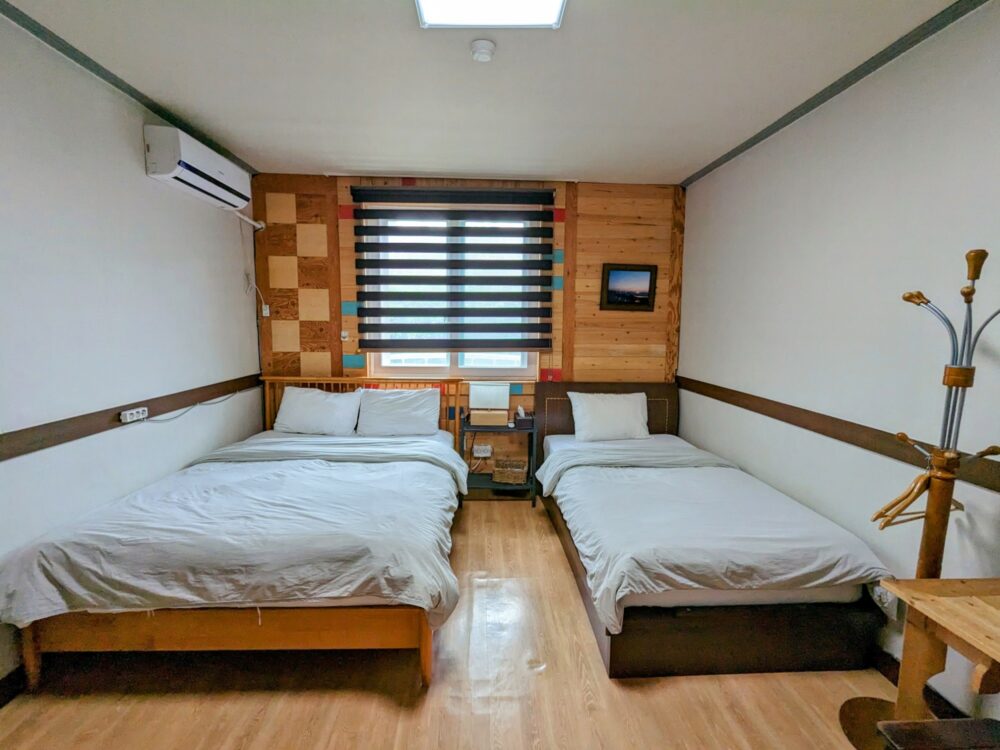
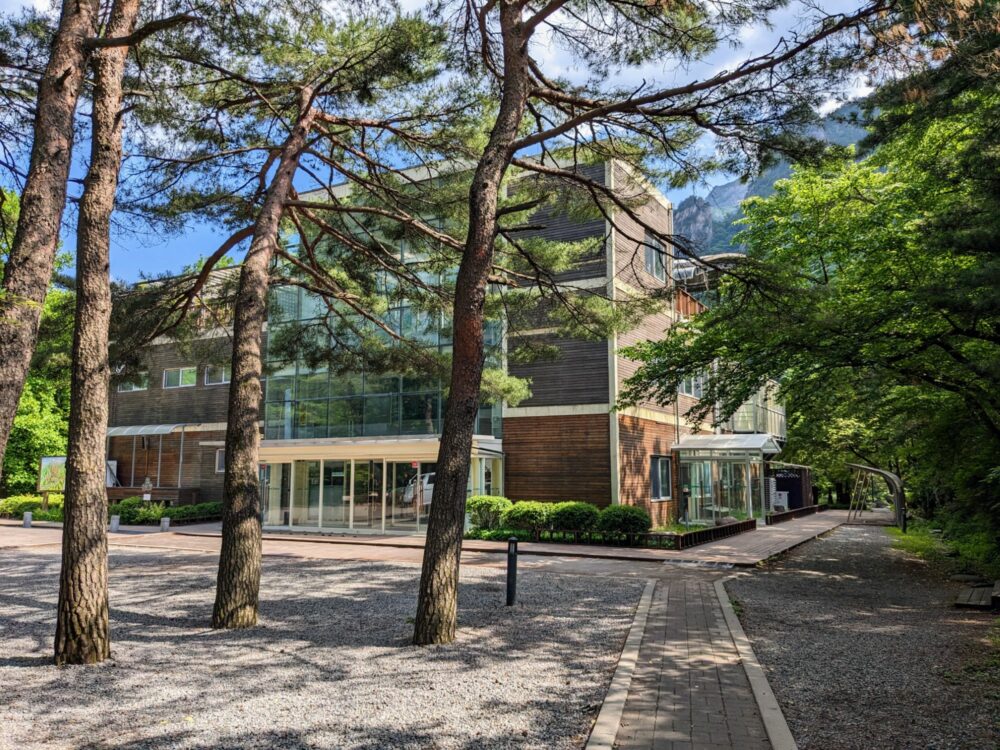
Staying anywhere else will require a bus/car ride or a lengthy walk to get to the park. We spent a couple of nights at Smile Resort, about three kilometres back down the road. It was the best-rated of the small cluster of hotels in the area, and didn’t disappoint: with friendly owners, clean, comfortable rooms, a good, simple breakfast, and reasonable prices, we were very happy with our decision.
There were a few restaurants and a couple of small convenience stores nearby: between them and the eateries in the park itself, we never had a problem finding food during our stay. The village itself was pretty quiet in May: that’s not peak time, and especially in the evenings, it didn’t feel like it either.
We could have walked the 45 minutes to and from the park each day, but instead just timed our departures to coincide with the 7/7-1 bus that runs between Sokcho and the park. There’s a stop on the main road, a couple of minutes from the hotel. The ride takes five minutes and runs every half hour or so: check the timetable in the Naver app so you don’t miss it!
South Korea Travel Tips
If you’re confused about making payments, how taxis and T-Money cards work, why Google Maps is so bad in South Korea, or other logistical stuff, I wrote a guide to that on my other site.
If you’re happy with a longer trip to and from the park, there’s a much wider range of accommodation and food options in Sokcho itself. I’d suggest staying within walking distance of the Express bus station if you’re relying on public transport; it just makes everything easier, especially if you’ve got anything more than a small bag with you.
With that in mind, Urbanstay Sockho Beach is my top pick. It’s a five minute walk from the bus terminal and the 7/7-1 stop, and only a minute more to the beach, with great views over the water.
The rooms are clean, modern and affordable, with average weekday prices of around ₩80,000 outside peak season. There are plenty of convenience stores and restaurants within walking distance, and both cooking and laundry facilities in the room if you need them.
Entrance Fees
We showed up at the park entrance, cash in hand, ready to pay the national park fee that we’d read about in every guide. Imagine our confusion, then, when the only person manning the ticket booth was fast asleep inside, with visitors streaming in and out through the gates alongside!
As it turned out, we’d timed our visit perfectly: the fees had been recently abolished and the park was now completely free to enter. The fee (₩3,500) used to be collected on behalf of the Sinheungsa Buddhist temple inside the park, but an agreement between the government and Buddhist leaders means that public funds are now used to pay for the maintenance of most major temples in the country instead.
Note that it’s only the park entrance fee that’s been scrapped, not any other associated costs. You’ll still pay for vehicle parking, food and drink, the cable car ride, and things like shelters and showers if you’re staying overnight in the park.
Eating and Drinking
It’s fair to say that based on my experiences elsewhere in the world, expectations for the food and drink options inside the park weren’t high. It’s also fair to say that those expectations were exceeded.
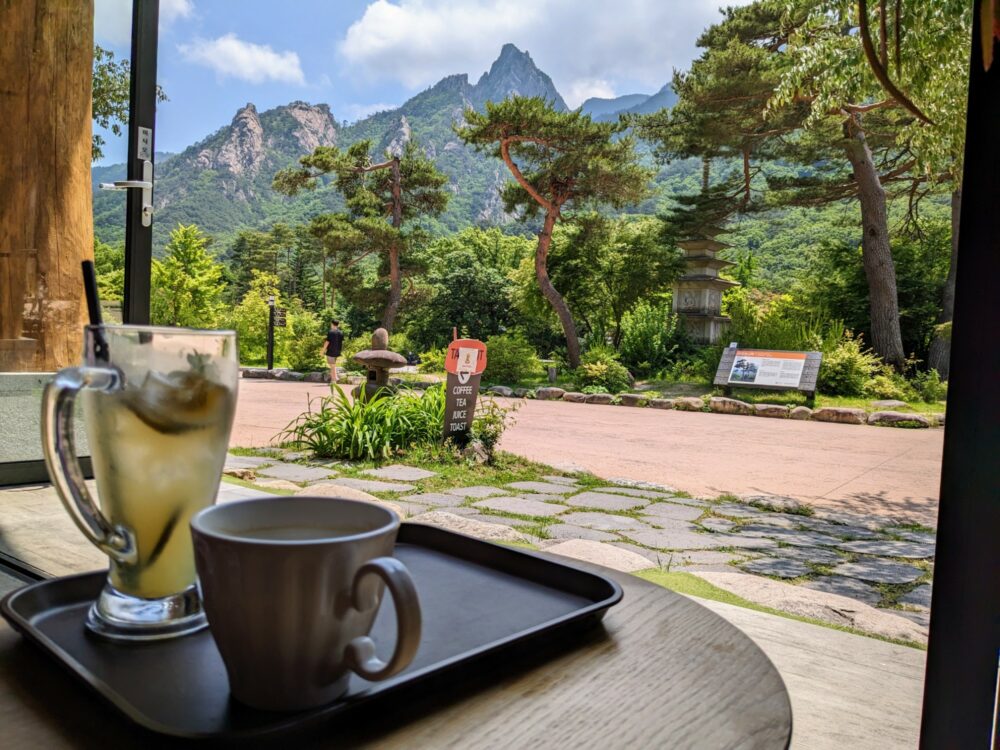
Soon after entering the park, you’ll come across several restaurants and cafes clustered along both sides of the path. This is by far the best place to eat or grab a coffee: while there are a few vending machines dotted around, your choices are much more limited elsewhere.
For hot and cold drinks, I’d recommend Dahyang. It’s hard to miss the big “CAFE” signs, but if you do, it’s on the right-hand side as you’re walking from the entrance gate. Not only do many of the tables have great views of the mountains, but it seems to specialise in honey-infused drinks that I didn’t see elsewhere.
I’m don’t really have a sweet tooth, but even so, I tried the honey Americano on one of my stops there. It was surprisingly good: sweet, but not as much as sugar or artificial sweetener, and much tastier than I expected.
Like all of the restaurants in the park, prices are higher there than you’ll pay elsewhere in the country. Even so, at ₩5,800 for a standard Americano, after a long day of hiking and with a view like that, I wasn’t too upset about it.
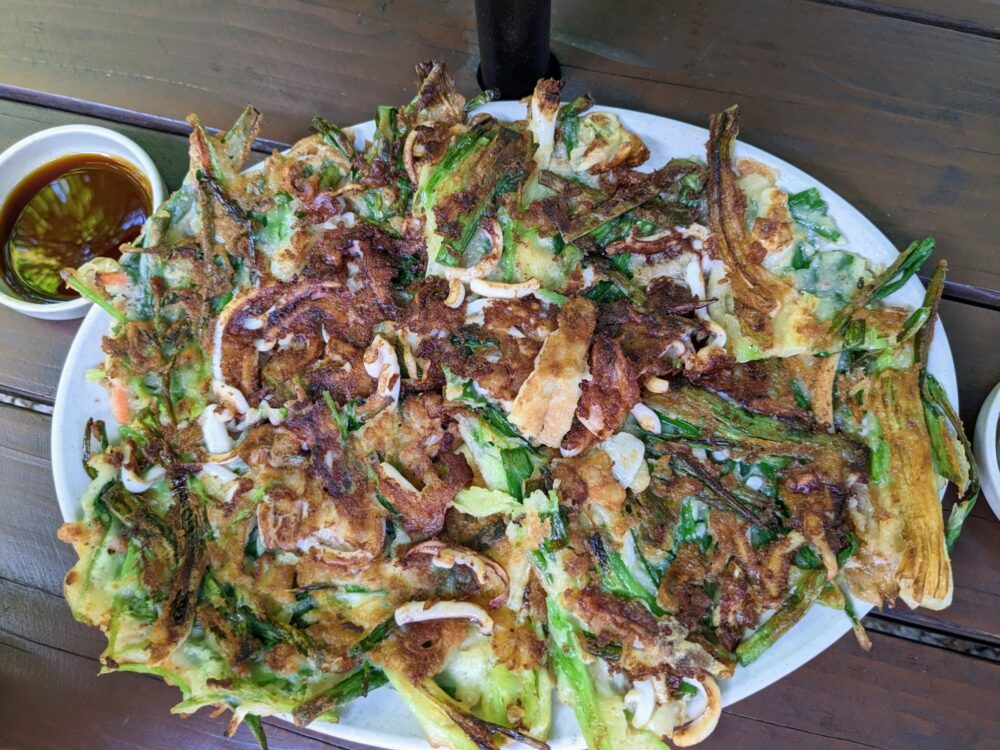
If you’re looking for food (and after hiking up to Ulsanbawi peak and back down again, I definitely was), make your way over to Daraejeong. It’s easy to find, just to the right of the cable car entrance, with several tables lined up under umbrellas outside.
We opted for the haemul pajeon, a seafood and green onion (scallion) pancake that you’ll likely see on many menus in South Korea. It really was very tasty, far better than it had any right to be given the location, and large enough to feed both of us.
Again, you could undoubtedly find the same dish cheaper elsewhere in Korea…and again, after that much walking, I wasn’t inclined to care when it tasted that good.
Given the choice of eating at one of the restaurants in the park or somewhere along the road back towards Sokcho, I’d go for the former. While the places I ate at near the park were somewhat cheaper, the food there wasn’t as good as what I had at Daraejeong in particular.
Obviously if you’re staying in Sokcho and happy to wait until you get back there, you’ll have a much better range of restaurants at standard prices.
Taking the Cable Car
Much and all as the highlight of Seoraksan National Park for many people is its hiking trails, you don’t need to be much of a walker to get great views. A cable car runs from the main restaurant and cafe area close to the park entrance, climbing 700m up to the top of Gwongeumseong Peak. All of the views, none of the sweat.
It’s believed that a nearby flat section of ridgeline was once the location of Gwongeumseong Fortress, although there’s nothing left of it now, and nobody is really quite sure when it was built. Whatever the story is, the main reason to head up there these days is for the spectacular views, not wandering around castle ruins.
In any case, if you’re considering taking the cable car yourself, you’ll need to put a bit of thought into it. That’s because your ticket is for a specific time, and can only be bought in-person on the day. There are no advance tickets, mainly because strong winds often cause the service to be suspended at short notice.
As with the rest of the park, things get busier as the day wears on. You’re best to head straight to the cable car office when you arrive in the park, and buy the next available ticket that suits your plans.
Cars leave every five minutes, and hold 50 people at once: despite that, they often sell out completely at peak times. If you buy a ticket for a few hours later and want to hike one of the trails beforehand, use the estimates in the section below to make sure you’ve got enough time.
Adult and teenage tickets will set you back ₩16,000, while you’ll pay ₩12,000 for children aged three and over. Infants under that age are free. All tickets are round-trip: other than falling off the edge, there’s no way back down the mountain other than the cable car.
The car whizzes you up to the top in about five minutes, at which point there’s a cafe, toilets, and outside viewing areas for taking in the surroundings. From there, take the path to the right: it’s a 15-minute uphill walk to the “fortress” site, which is basically just a big, flat-ish rocky peak. Give yourself about half an hour to look around and take photos in all directions before heading back.
Once you do get back to the station, keep walking past it to the small temple in the other direction: it’s less crowded that way, and there are still plenty of good views to be had. When you’re ready to head back down, just line up: unlike when you came up, there are no set timings for the return journey. That can make for a bit of a wait at busy times, so do factor that into your plans.
One thing worth mentioning here: while the views are stunning on a clear day, there really isn’t much point in heading up on the cable car if there’s lots of cloud or low fog around. Basically, if you can’t see the top cable car station from the bottom, you won’t be able to see anything when you’re up there either.
The Best Day Hiking Trails In Seoraksan
You can break the hiking trails in Seoraksan National Park into two basic categories: day walks, and multiday hikes. The multiday versions take you deeper into the park, with one or two nights spent in simple huts along the way.
As rewarding as those hikes are, it’s the day walks that attract the visitors. With a moderate degree of fitness and a few hours to spare, you’ve got your pick of impressive trails that take in everything from tumbling waterfalls and beautiful valleys to panoramic views atop jagged mountain peaks.
The difficulty levels vary between the trails, and often within each trail as well: the first parts are along the valley floor and generally quite easy, before things get steeper and more difficult further on. The weather obviously plays a part as well: heat can be a real issue in summer, as can snow and cold in winter. You can always turn back partway through if you’re finding things too hard or are running out of time.
With that in mind, these are the three best day hikes that I’d most recommend tackling. With enough stamina you could walk all three in a day, but given the amount of stair climbing involved, it’s not something I’d particularly suggest doing. I spread them over a day and a half, and I’m glad I did.
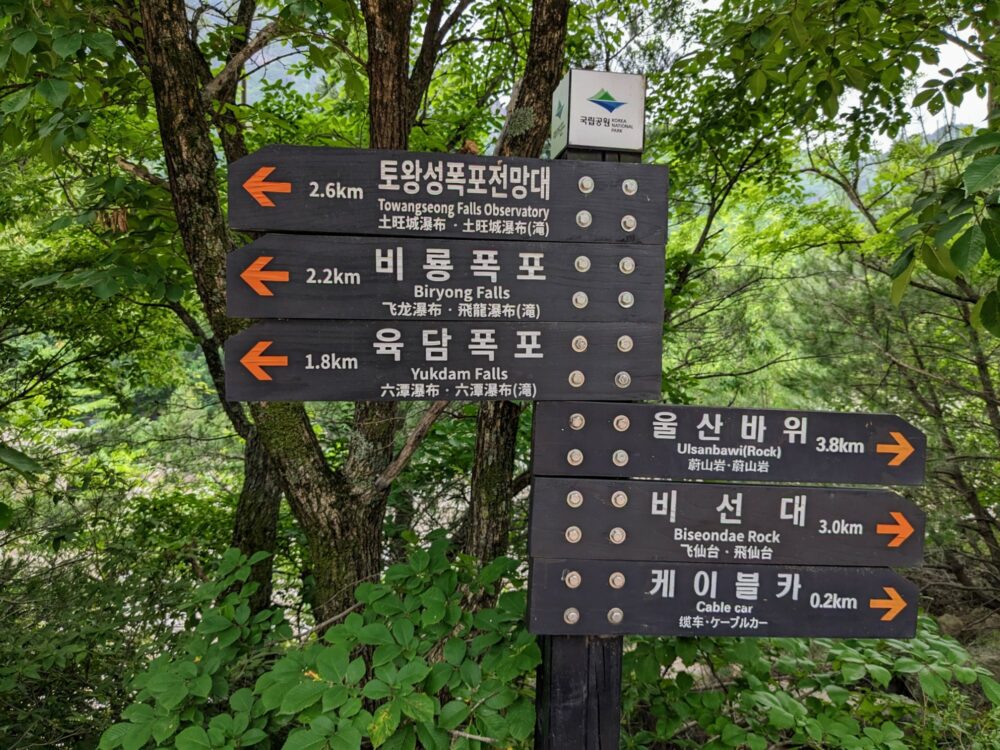
All of the trails mentioned are very well signposted in Korean and English, both from the main Sogongwon Park area and along the trails themselves. You generally don’t have a lot of choices to make about which way to go anyway: there’s usually just one clear path to follow.
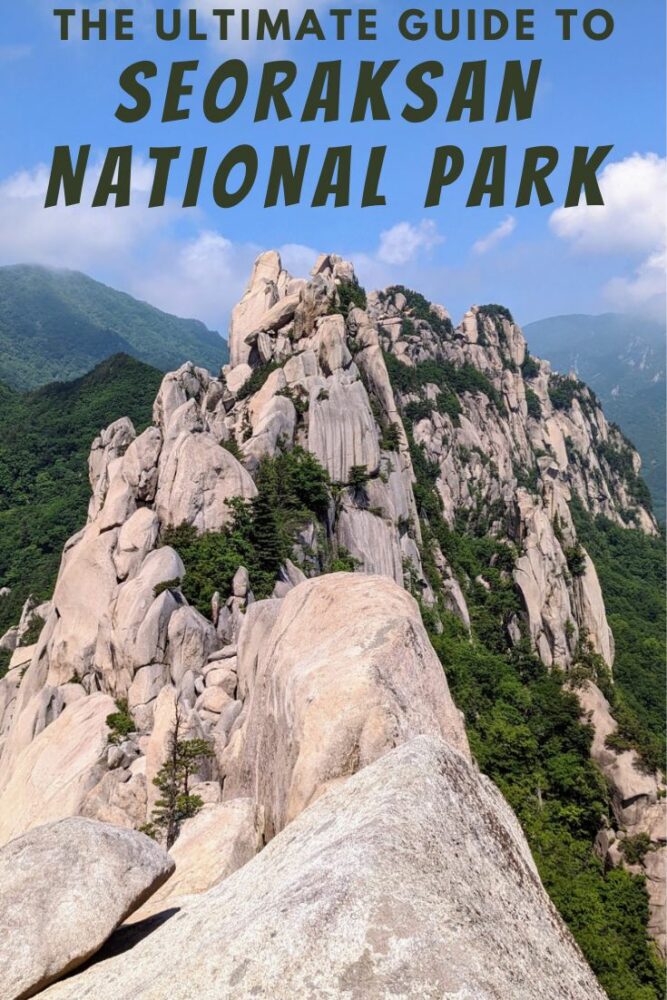
Ulsanbawi Rock Trail
Length: 7.6km return
Duration: 3-4 hours
Difficulty: Hard
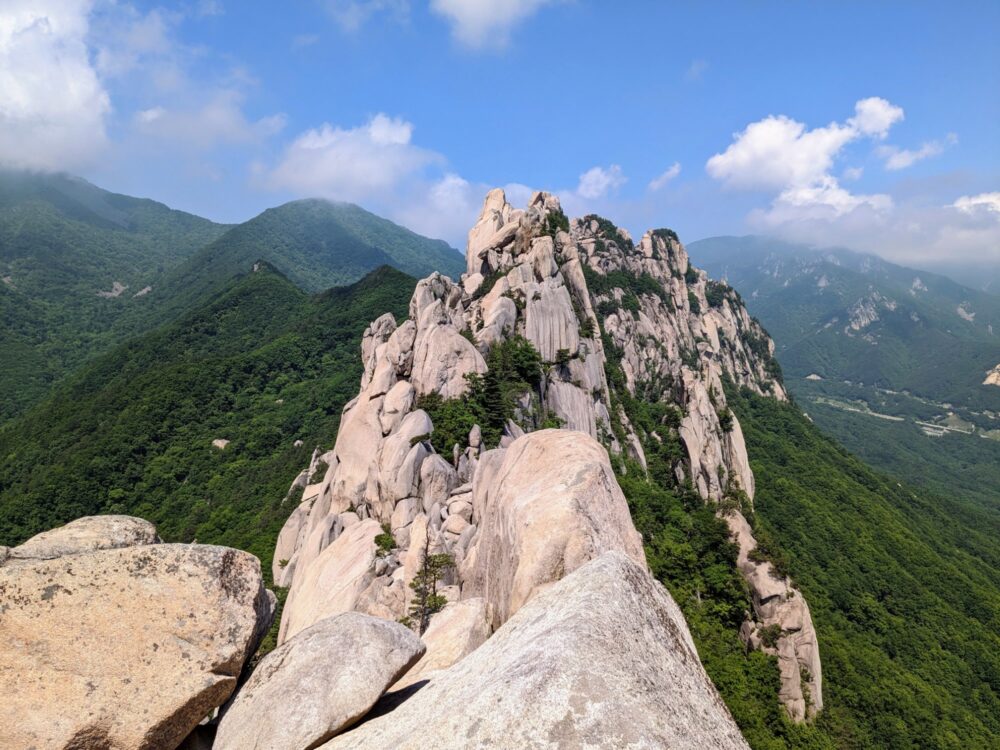
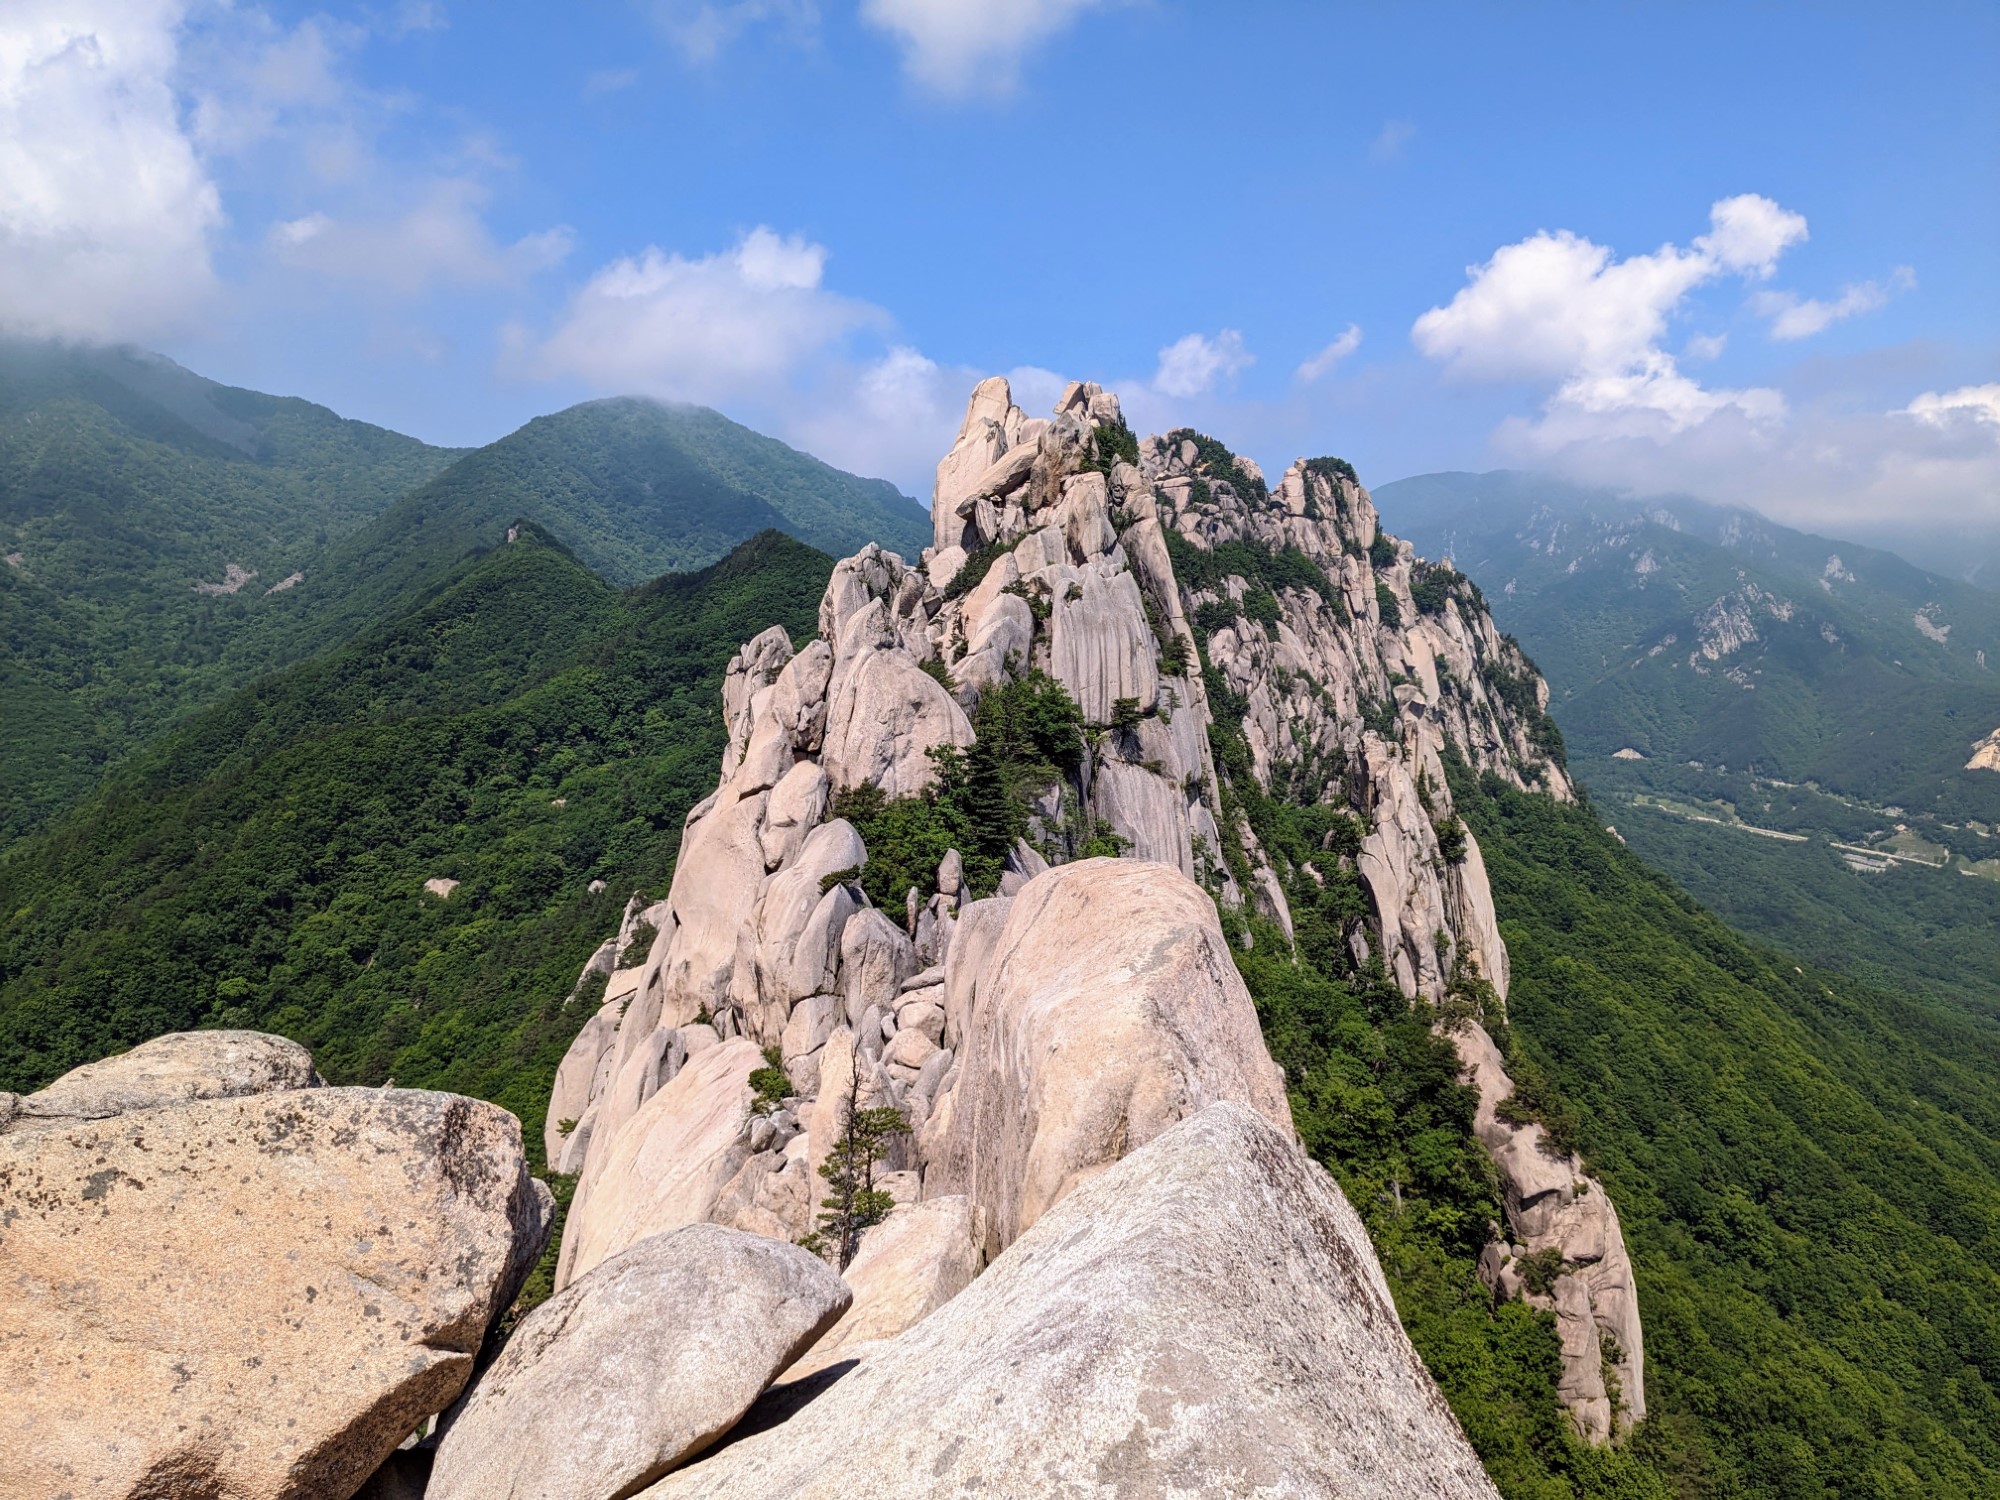
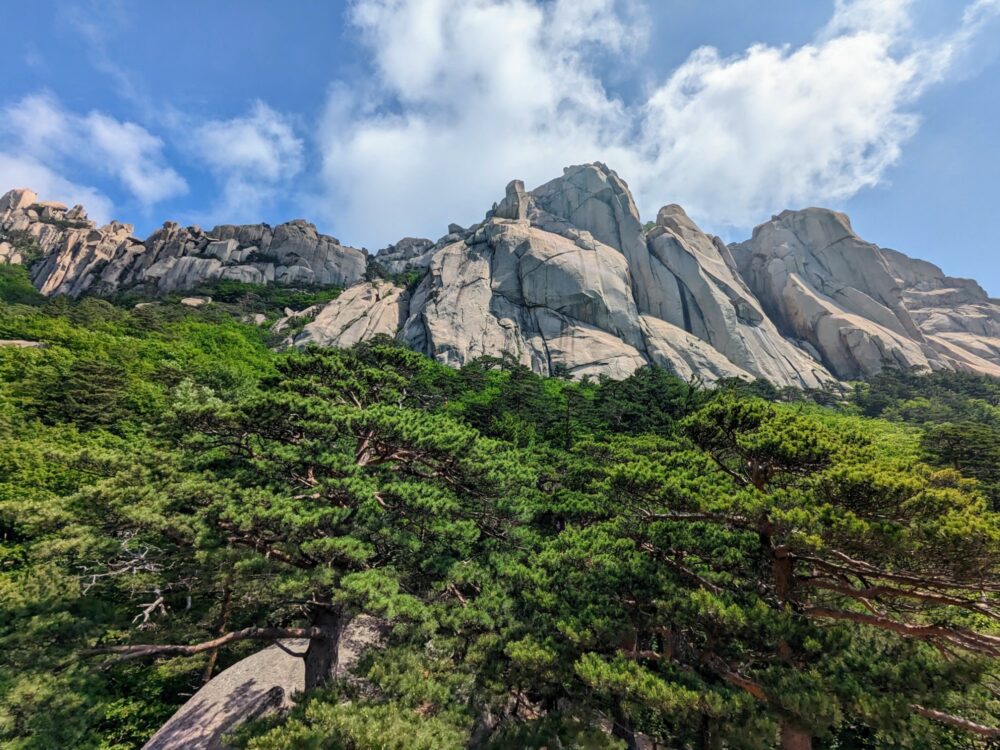
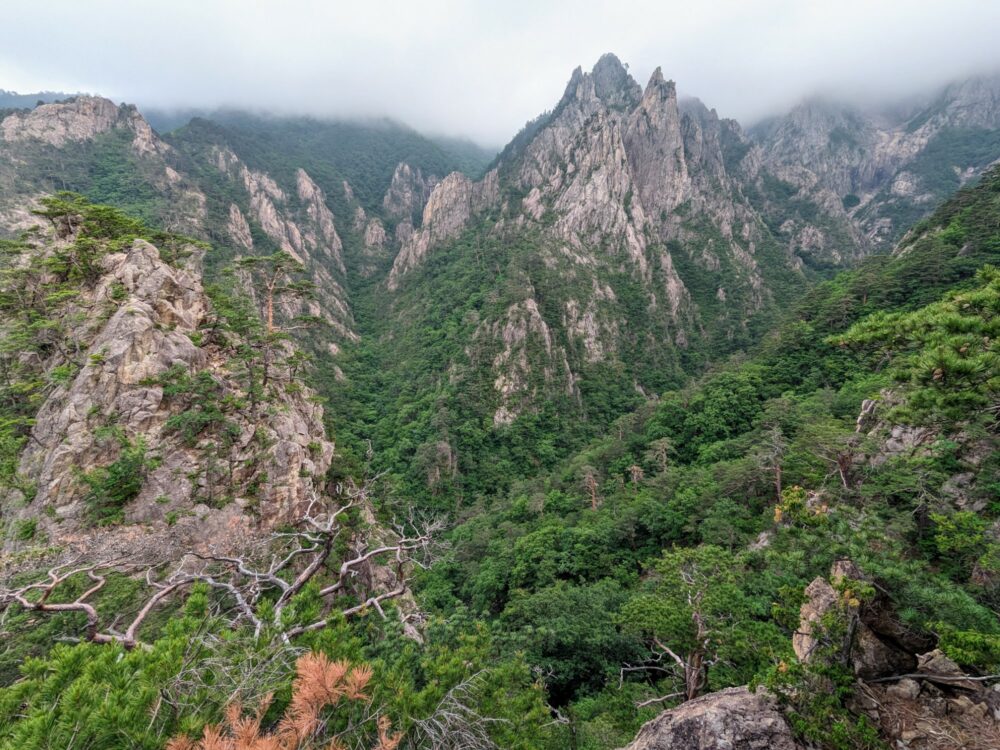
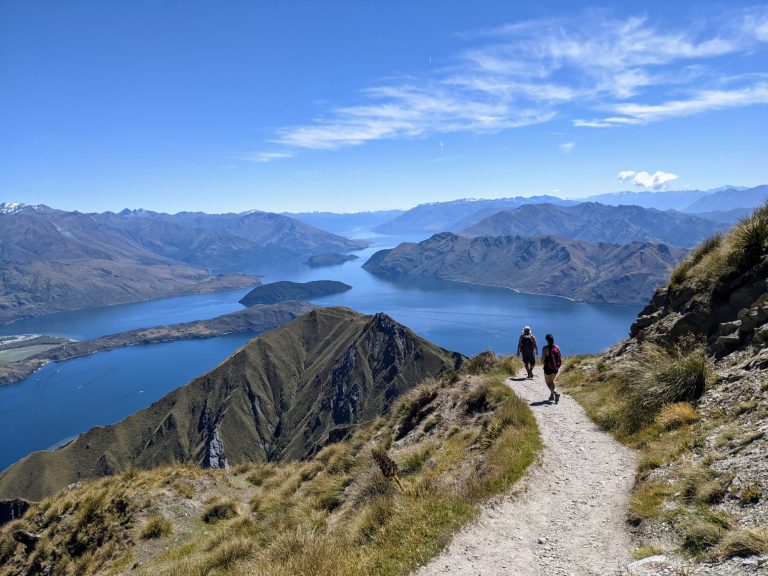
Almost certainly the biggest attraction in the park, the hike to Ulsanbawi Rock is an absolute highlight on a clear day. Along with spectacular views over the valley on the way up and from the top, you also get to admire Ulsanbawi Rock itself, a distinctive six-peaked granite ridge that sits around 870m (2860ft) above sea level.
Starting from the main entrance, follow the signs for Ulsanbawi Rock over a small stone bridge towards Sinheungsa Temple. I talk more about the temple below (it’s well worth visiting), but for now you continue on past it, before branching off to the right to start the trail itself.
The first part beside the river is deceptively easy, with a concrete path to walk on and minimal climbing to do. The concrete ends and the climbing starts once you hit the first set of stone steps, but even this section isn’t too difficult, with lots of tree cover until you reach Gyejoam Temple.
Built into the mountainside, there’s a bit to see at the temple, including a famous “rocking rock” (Heundeulbawi) that seemed to be a very popular place to get a group photo. Either way, this is a good place to stop for a rest: it’s one of the last flat areas until you get to the top.
From there, the trail continues upwards, past a viewpoint on top of a large boulder that’s worth clambering up on to. I got a great view of Ulsanbawi from here, as well as the thickly-forested valley below.
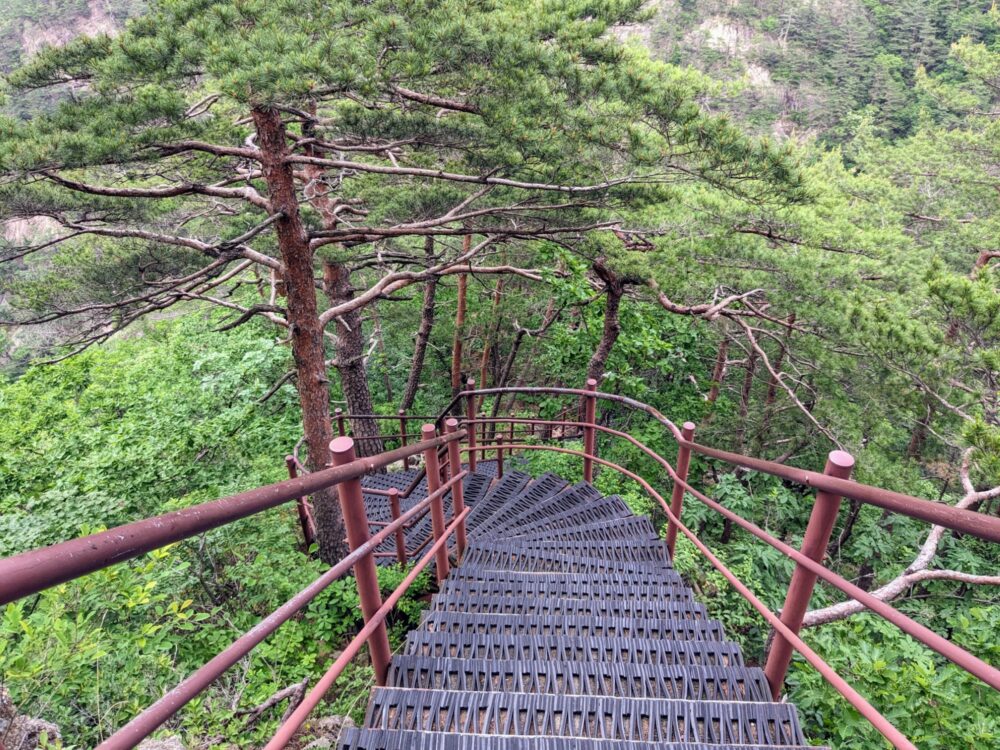
From here, it’s less than a kilometre to the top, but it’s by far the most difficult stretch. It’s essentially one long staircase the whole way, many hundreds of steps, with no real shade once you’re out of the tree line. It gets pretty exhausting, especially in hot weather, so take as many breaks as you need and drink plenty of water.
I eventually emerged at the top of the stairs, legs burning and lungs gasping, to a spectacular view that made it all worthwhile. I was lucky to be there on a clear day, with only a few white clouds around and great visibility all the way to Sokcho and beyond. It wouldn’t have felt quite so rewarding in cloud and fog!
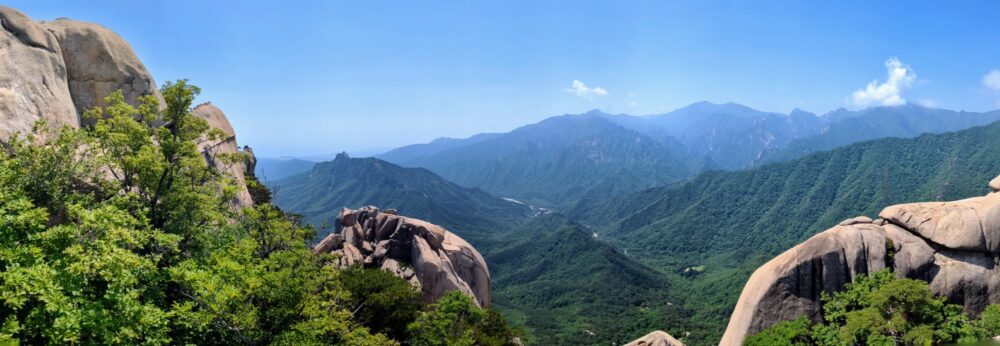
There are a few different viewing areas at the top; they’re close to each other and give different perspectives of the park and surrounding countryside, so it’s worth taking photos from all of them. This is the ideal place to have lunch or a snack, depending on when you get there: you’ve earned the rest break!
While the return trip is faster and not as much of a cardio workout, it gets hard on the knees after a while. Let’s just say I was pretty happy to see the end of the steps and get back to some flat ground again at the bottom!
Because this is such a popular walk, I’d highly recommend starting early, especially during the warmer months. Not only do you avoid the afternoon heat, you also avoid the worst of the crowds. At weekends and peak times, there can be quite a line of people climbing up and down and waiting for their photo op at the top.
We were there mid-week in May, and started walking about 9:30am, getting to the top at 11am, and back down again by 12:30pm. That included brief rest stops on the way up and a longer break at the top. It wasn’t very crowded on the ascent, but we passed a lot more people on the way back down.
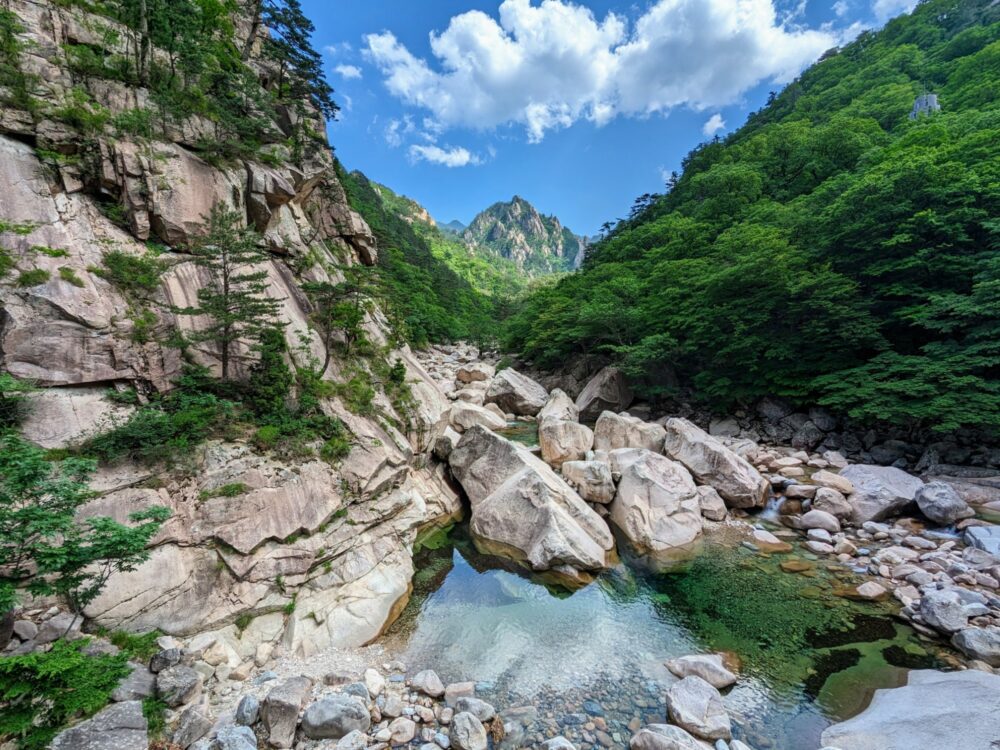
Biryong Falls Trail
Length: 4.8km return
Duration: 1-1.5 hours
Difficulty: Moderate
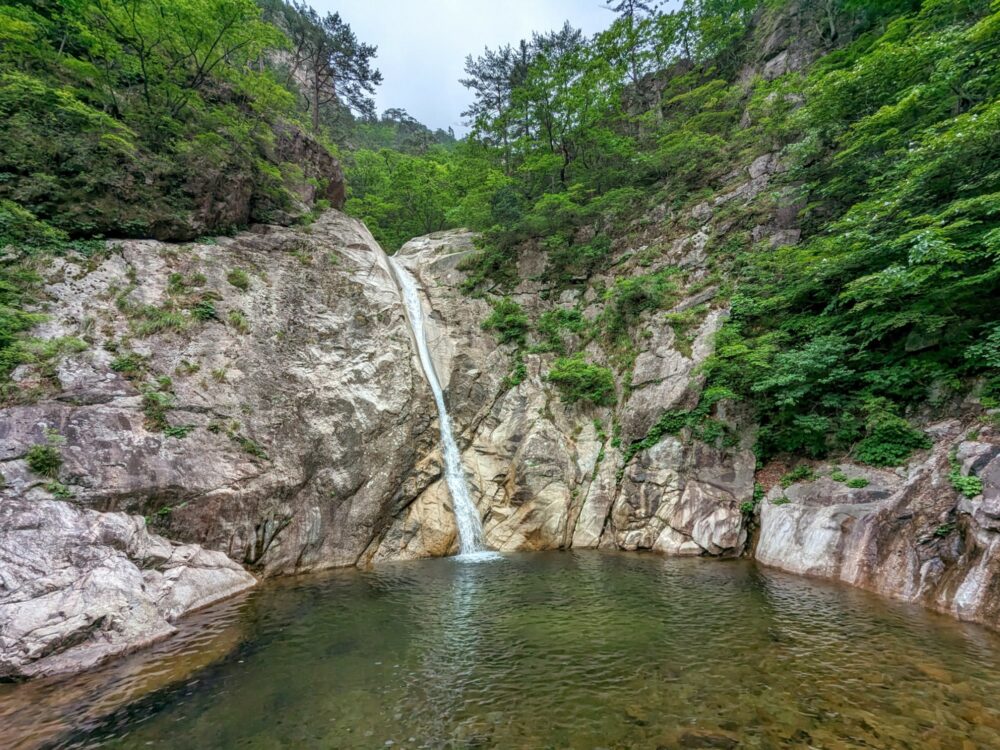
If you’re a fan of waterfalls, look no further than the Biryong Falls trail. This relatively short hike starts out on a wide, flat nature trail through the forest, before climbing steadily alongside the river to two different waterfalls.
You’ve also got the option of extending the walk up a (very) steep staircase to an observation deck for the Towangseong Falls, a three-part, 320m waterfall that’s the tallest in the country.
This popular path starts from the same area near the park entrance as the others I mention, but instead of heading towards Sinheungsa temple, immediately leads over a long stone bridge across a wide stretch of the rocky Ssangcheon river. Keep left at the end, following the signs (or depending on when you’re there, the crowds) towards Yukdam Falls.
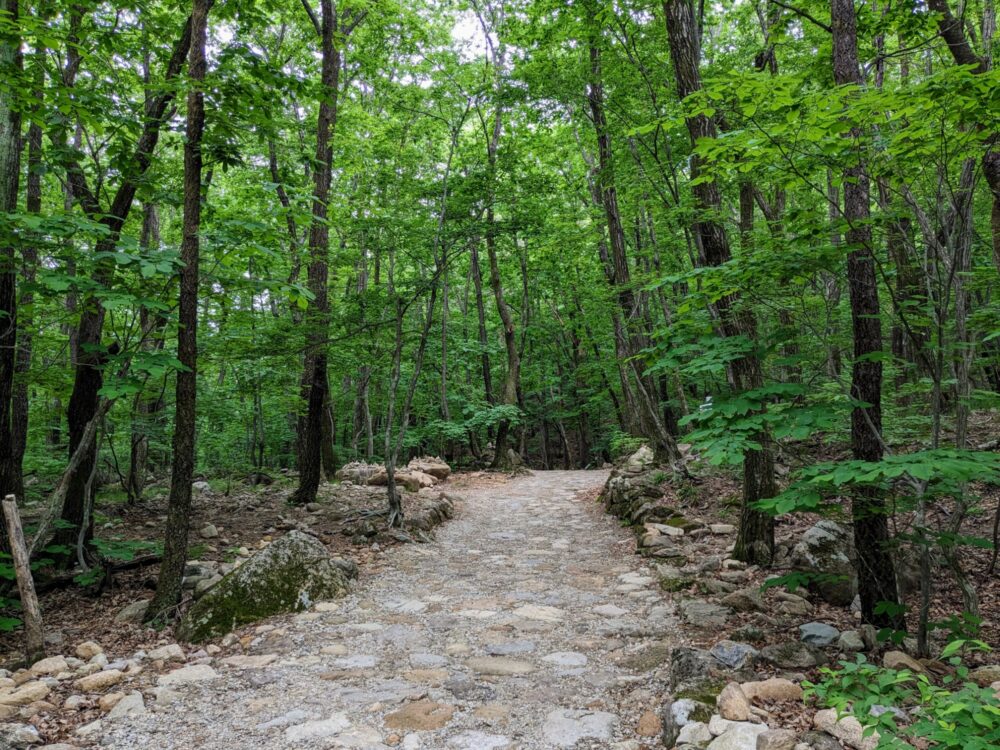
The first part of the walk is very easy, nothing more than a gentle stroll through woodland. It’s a good place to spot birds and other wildlife, at least when it’s quiet: there were only a few other people around when we walked it, but it can get very busy at weekends and peak season.
The trail eventually turns off to the right, becoming a little steeper and rockier as it approaches Yukdam Falls. The path is quite narrow here, but you’re rewarded with some lovely views as you approach and cross the suspension bridge over the falls.

This is a very popular spot for a photo: if it’s too busy on the way up, rest assured, you’ll get another chance on the way back. Once you’ve filled your memory card, continue over the bridge and on towards Biryong Falls.
The section of path is steeper and rockier than the last, and really the only reason why I gave this walk a “moderate” rating above. It’s definitely on the easy side of moderate, though, especially because it’s pretty short: with only about 400m between the two falls, most people should be able to manage it just fine.
Biryong Falls itself was a bit of a disappointment: with only a 16-metre drop and under what were by now quite cloudy skies, it wasn’t exactly the highlight of my time at Seoraksan. Still, it’s a good place to relax and have a snack or a drink, and there’s plenty of seating around the pool at the base of the waterfall.
Now, you’ve got a choice to make. Many people turn around at this point, returning the way they came back towards the main part of the park. If you’re feeling fit, however, there is an alternative.
Optional: Towangseong Falls Observatory
As you approach Biryong Falls, you’ll notice a sign pointing off to the right, up a staircase to the Towangseong Falls observatory. It’s only an extra 400m, but other than the occasional bench, there’s no respite: it’s basically like being on a Stairmaster the entire way.
Expect to take 15-20 minutes to get up there, and to be seriously short of breath when you do. Once the panting subsides a little, you’ll find yourself on a multi-level observation deck, looking out towards a pretty significant mountain range.
Off to the right, this is where Towangseong Falls tumbles over 300m down the rock walls, although you’re a long way from it: between that and the low cloud that had rolled in, there wasn’t much to see on the day I was there.
Even so, because you climb above the trees growing up from the valley below, the views of the rest of the area are pretty impressive. I could see as far as Sokcho off to the left, glistening in the sunshine that hadn’t yet made it to where I was standing.
You probably won’t spend too long on the observation deck, no more than five or ten minutes, before heading back down again. From the bottom of the stairs, just follow the main path back to the start point.
Biseondae Rock Trail
Length: 6km return
Duration: 1.5-2 hours
Difficulty: Easy
The Biseondae Rock trail was the last hike I did during my time in Seoraksan, and definitely one of the best. It’s the easiest of the three walks I mention here: you follow a stream up the valley the whole way, under tree cover and along mostly flat, well-formed paths.
As the name suggests, the trail goes to Biseondae Rock, a large, smooth rock that turns into a waterfall after heavy rain. There was no sign of falling water when I was there, but the stunning scenery all around more than made up for it!
Starting from near the park entrance, you cross the same stone bridge towards Sinheungsa Temple that you do for the Ulsanbawi Rock trail, then turn left along a wide paved path through the forest. There’s a stream on the left hand side that you catch glimpses of along the way, with a few clearings cut out here and there so you can get a better view.
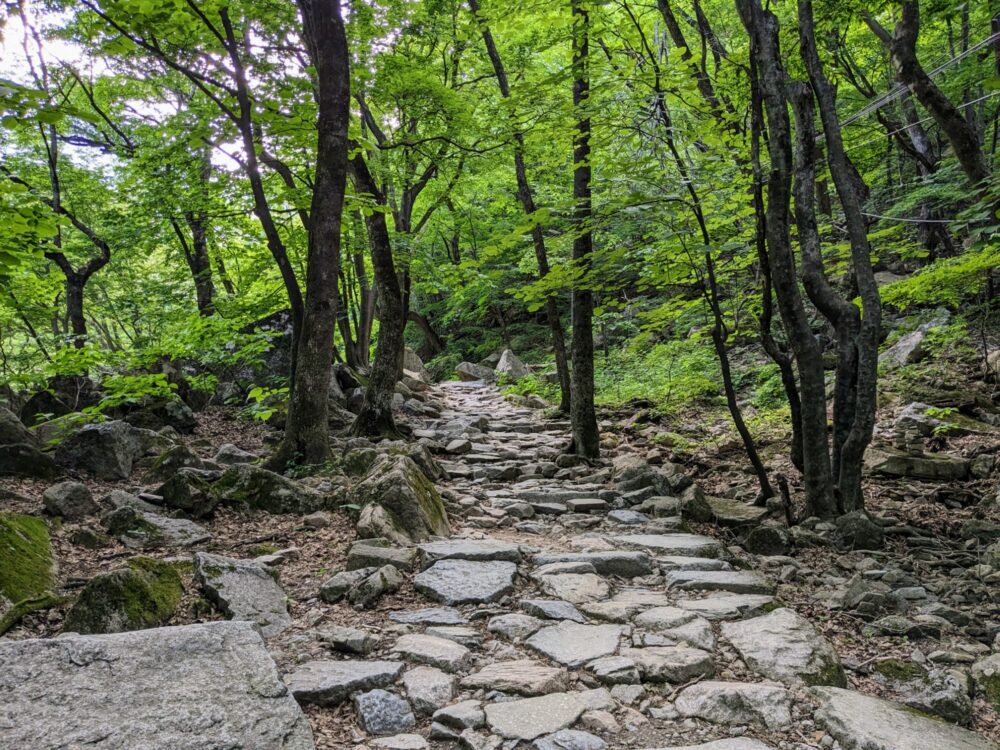
The first half of this 2.3km section of path is almost completely flat, and gets only a little steeper (on a dirt and stone track) for the second half, after crossing a stone bridge. It’s all very easy walking, though, especially compared to any of the other popular hikes in the park.
As scenic as the walk to Biseondae Rock is, it’s when things open up right at the end that it gets seriously pretty. I timed my arrival perfectly and ended up with the place almost entirely to myself, a couple of families leaving soon after I got there. It was super-peaceful, with just the sound of rushing water for company from the small rapids below.
To find myself in such lovely scenery after less than an hour of easy walking made me very happy, and I lingered for a while before finally heading back to the start. It was the perfect trail to end my time in the park, after giving my calves and knees a major workout the rest of the time!
In terms of what you get out of it for what you put into it, I’d probably have the Biseondae Rock trail even higher on my list than Ulsanbawi. Sure, the views from the top of Ulsanbawi Peak are far more dramatic and expansive, but they take a lot more effort to get to as well.
If you’ve still got plenty left in the tank when you get to Biseondae Rock, you don’t have to turn around there: instead, cross the bridge over to the small information centre, where the path splits in two. One branch heads up to the right, towards Geumganggul cave, while the other veers left towards a couple of pretty waterfalls and the Yangpok shelter.
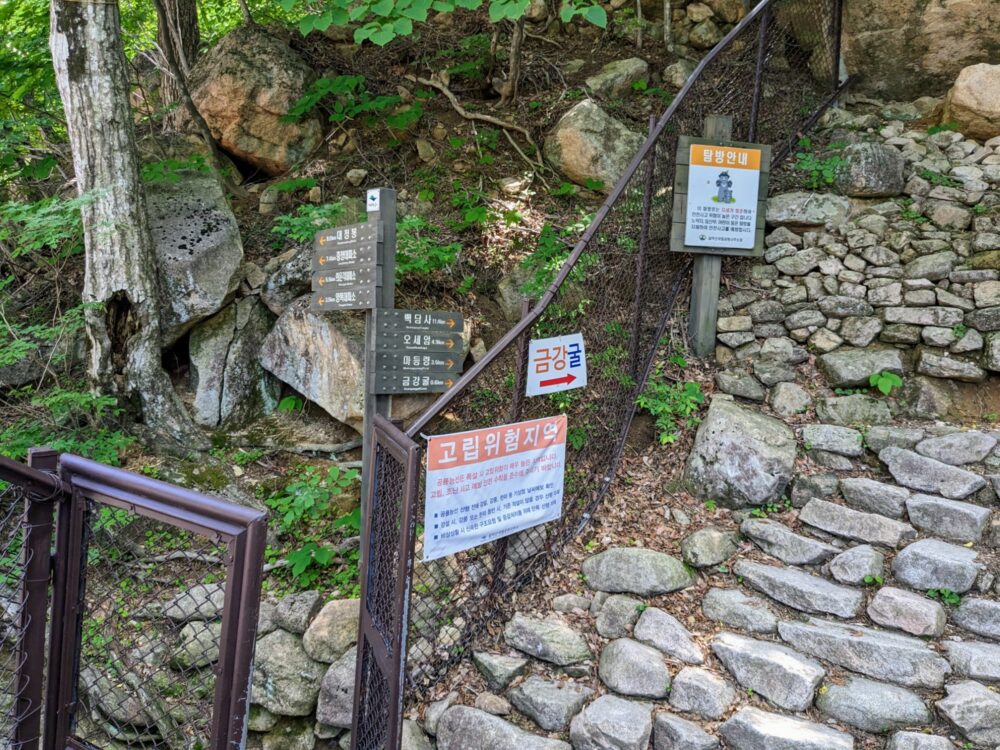
The trail up to the cave is only 600m long, but the steps are very steep: bear that in mind if you’ve already climbed up to Ulsanbawi earlier that day or plan to afterwards! On the upside, the views over the valley from the mouth of the cave are very impressive, and the cave itself holds a small Buddhist temple which makes for a good place to rest before you start your descent.
The trail towards Yangpok shelter isn’t anywhere near as steep as the one to the cave, more of a steady incline than a gut-busting climb. It’s 3.5km from Biseondae Rock to the shelter and nearby waterfalls: expect to take 2-3 hours to walk there and back. You can also book a bunk bed in this shelter (and others) if you’d like to stay the night and explore further the following day.
This section of trail beyond Biseondae Rock is affected by trail closures in winter and spring: exact reopening times vary each year depending on how much snow there’s been.
Expect that up until around mid-May, you won’t be able to walk most of it, and even the track to the cave will require you to start before 2pm and be back through the gate before 4pm.
Other Things to See and Do There
While the hiking trails, viewpoints, and autumn foliage are the main attractions of Seoraksan, they’re not the only reasons to visit. The area is home to the oldest Zen Buddhist temple on the planet: for some, this is the main reason they visit the park. For everyone else, it at least makes for an interesting area to look around after doing one of the many hikes that start nearby.
Giant Buddha
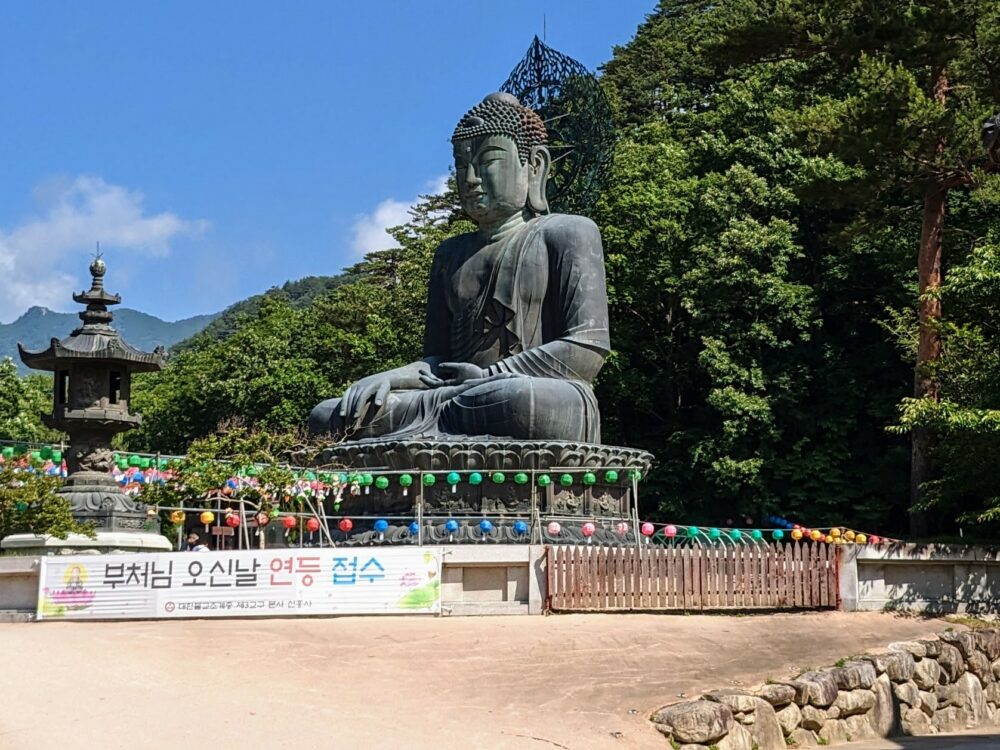
Even if you’re not the most observant person in the world, it’s very hard to miss one of park’s major attractions: a nearly 15m (45 ft) tall bronze Buddha statue. It’s the largest seated Buddha statue in the world, and while officially part of Sinheungsa temple (below), it’s separate from the main complex, on your right before you cross the stone bridge.
It’s in a stunning location, with dense trees surrounding it and mountains all around, so be sure to grab a few photos as you pass. If you’re particularly interested, there’s also a small temple inside the base of the statue itself.
Get regular travel, hiking, and tech updates from me
News, reviews, guides, and more, from here and around the web
Sinheungsa Temple
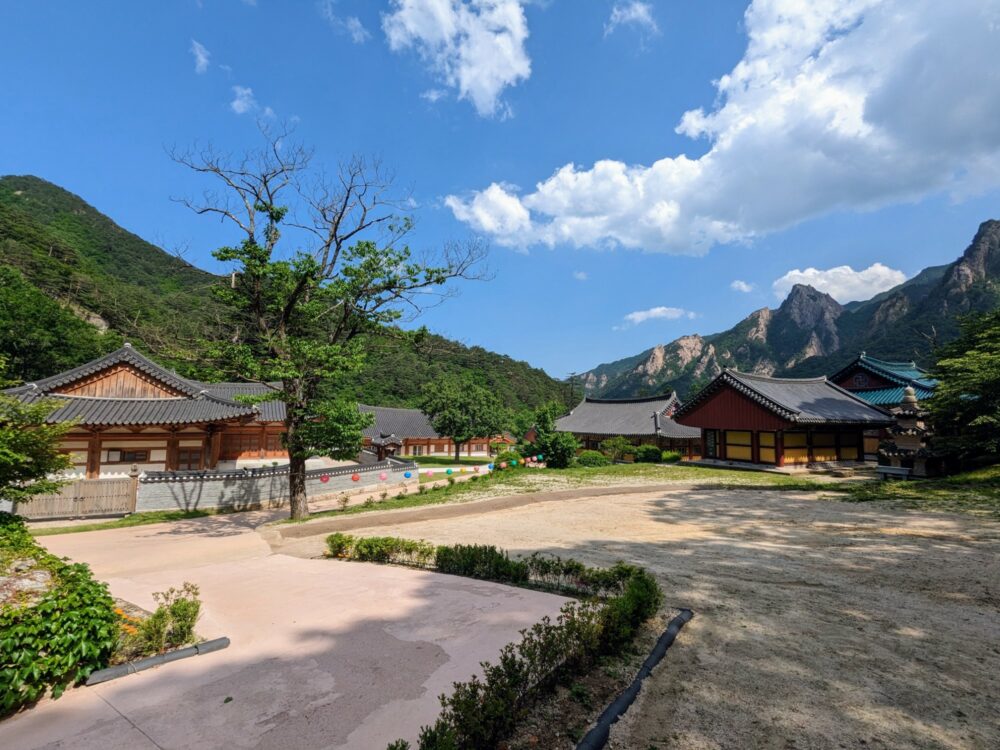
I’ve been to many impressive temples over the years, but few have been in quite such a beautiful location as Sinheungsa. When it comes to finding a place to search for enlightenment, I’m not surprised that this spot appealed.
First constructed in the mid 600’s AD, the temple has caught fire and been rebuilt at least twice since then. Even so, the current version has been there for about 500 years: if I look as good as this after five centuries on the planet, I’ll be pretty happy about it.
To find it, just keep walking past the giant bronze Buddha and on over the small stone bridge: the temple is well-signposted from the entrance, so you shouldn’t have trouble finding it. You’ll walk directly past it on the way to and from Ulsanbawi Peak, so most people won’t even need to go out of their way.
Once you’ve walked through the impressive wooden entranceway, give yourself a bit of time to explore the temple buildings and grounds. Unlike some of the temples in Seoul and elsewhere, it’s not particularly large: we were in and out in about quarter of an hour.
If you’d like a much closer look at what life is like in the temple, it’s also possible to sign up for temple stays. With these, you’ll spend two or three days living with the monks in the temple, taking part in prayers and eating simple vegetarian meals twice a day.
So there you have it, my guide to Seoraksan National Park! Do you have any questions? Did I leave anything out? Drop a comment below and I’ll do my best to help!

This is really comprehensive. Heard it is a fantastic place to visit, but have not been so fortunate yet. Seoraksan is on my list tho.
Thank you, this was very thorough and helpful! I likewise am having trouble finding information on this park, especially for my 4 and 2 year old. Seems like the Biseondae Rock Trail would be the best bet for them. Are there any trails this easy to prettier waterfalls?
Sadly not 🙁 I agree with you, though, that the Biseondae Rock trail would likely be best for younger kids — it’s really pretty flat the whole way, and while the views at the end are definitely the most impressive part, there’s lots of nice little river views and bridges and things along the way as well.
Have fun at Seoraksan!
Very well written with loads of helpful information. I got few questions:
1. Out of all the trails which one is the best one to do?
2. We plan to take first bus from seoul on a weekday at 6am. Checkin to hotel near sokcho bus terminal – pampas hotel (250metre) to drop luggage and head to trail. Is it a good idea to do cable car after the trail?
2. I am planning to go to Sokchu for two days and one night. Also, planning to cover: Sokcho beach, Lake Chongcho, Chilseong shipyard(cafe), Port Daepoghang , Naksansa temple, Terarosa coffee main brach
Hope above is manageable? We will take late evening bus next day from sokcho to seoul
You don’t say when you’re going – the ‘best’ trail will depend on the time of year, your fitness level, how much time you want to devote to it, etc. It’s really your decision to make.
Ulsanbawi has the best views, but it’s the hardest and most weather dependent. Biseondae is much easier and very pretty at the end, but not as impressive overall.
If you’re not arriving in the park until mid to late morning, especially at busy times of year, you may not have a lot of choice about when you can get a cable car ticket for. Ideally do it immediately so you can then walk the trail(s) at your leisure, but if not, just try to give yourself enough time to walk whatever trail you decide on first.
That sounds like a busy day and a half and won’t give you much time in the park, but if it’s all you have and you want to see all the other things you list, I guess it is what it is. Personally I’d try to squeeze another day into your itinerary if possible, but it’s up to you.
Sorry for delay in replying dave. We are planning to go on 24th April. Would be staying at ramada hotel (3km from sokcho express bus terminal). If we take the first bus at 6am from Seoul then hopefully we should reach hotel by 9am max. We just plan to drop luggage and head to seoraksan. Which trail would you recommend on first day? And which one on next day morning? We plan to do two trails.
I’d be basing the decision about which trail to do on the weather. If the skies are clear when you arrive, go up Ulsanbawi straight away. If not, then Biseondae stays much lower and you’re not really walking it for the expansive views anyway, so I’d do that one instead and hope you get better weather later in the day or the next morning.
I just want to thank you for your outstanding post! I got so much out of it, I can’t thank you enough.
I was unsure whether I was going to be able to figure out how to get there and whether it was all worth it, but you have convinced me!
No problem – glad you found it helpful!
This post was extremly helpful! Thank you for such a great summary.
Thanks Gisela!
Thanks for the information Dave, very clear. This place looks impressive. I’m planning to go next April/May. I have a question regarding the park: since I’m just starting to plan I didn’t research top much, but I’ve read Korean parks close some time during Spring, do you know if this means the whole park closed? Or it’s just some specific trails?
Yes, many trails in most national parks in South Korea are closed in spring, usually from Feb/Mar until some time in May, due to fire risk. They often get closed due to snow in winter as well.
Parts of Seoraksan are no exception, but fortunately for visitors, the three trails I mention in the article aren’t included in the spring closures.
Thank you for this very detailed post. Would you know if there are taxis we can get from the park to the terminal? We are planning to head straight there after the hike. I know it’s tight but wanted to catch the sunset.
I mentioned this briefly in my ‘how to get to Seoraksan’ post (here), where I said There’s a taxi rank outside Sokcho Express terminal, or you can use the Kakao app to arrange a pickup from your hotel or elsewhere. Likewise, hotel staff should be happy to call you a taxi as needed, or arrange a private driver for you. Note that you may find it harder to get a taxi back again: I only noticed one or two waiting around for a fare when I was there.
Given that, and that you’ll be on a tight schedule where you don’t really have time to wait around for a taxi to show up if there isn’t one there immediately when you need it, I’d probably suggest trying to arrange a pickup instead. Hotels in Sokcho should be able to do this for you, or you could try to arrange it directly with a taxi driver yourself beforehand, assuming they have enough English.
Just returned from Korea and your guide to this National Park was absolutely spot on and immensely helpful. Thank you!!!!
Thanks Dave, so happy you found it useful!
Hi Dave thanks for the information, very useful! I’ll go to this mountain in April with my wife’s family, we want to visit one of the temples. What type of shoes do you recommend for the trekking??
I was wearing these lightweight walking shoes, and they were ideal for walking in spring — plenty of grip but my feet didn’t overheat in them. I’d suggest something like that, or trail runners, rather than proper hiking boots: the trails are comparatively short and very well maintained, so your only real risk is slipping if there’s any rain around.
Excellent guide, very comprehensive. As a non-hiker, I really appreciate the way you describe and rate the hikes. Thank you!
Thanks KC!
Great information. Thank you! Did you visit the waterfalls near Yangpok shelter and are they worth the extra 2-3 hours hike? Do you remember the names of the falls? Thank you!
I didn’t, unfortunately — they were on my list and I’d hoped to make it out to them, but I ended up running out of time. I wouldn’t have got there and back before the park closed, so had to give them a miss in the end. 🙁 There are a couple of waterfalls near the shelter: Yang and Oryeon.
Thanks for the tips!
Your post (incl the one on getting there) was the best prep for my trip to Seoraksan! One add-on that might be useful for others: until mid May the high altitude trails are closed which partially includes the hike up to the cave beyond Biseondae Rock. The gate there is only open until 2pm and exit must be until 4pm latest. For me the view from there was the best out of the 3 shorter hikes! Thanks again!
Thanks Inka! You’re right, that’s useful information — I’ll add it into the article now. 🙂
A useful post, thanks. We’ve just arrived in Sokcho – hike tomorrow!
We have 4 days in the area 🙂 so looking forward to some scenic views!
This post helped me already a lot, thanks!
I will visit the park on September 20th and 21th. Is there any reservation needed if I want to hike the ulsanbawi trail starting at main entrance? Can you entrance the park in the afternoon? I have read on the page of visit Korea it is not accesible after 2PM and even 12PM in winter. Is September considered winter time or summer time?
thank you so much for this! just want to ask along the way is there a chance to buy water or you need to have enough before starting the hike? TIA!
It depends on which walk you’re doing. I’m pretty sure I saw water for sale on the Ulsanbawi trail, but not the shorter ones I mention.
Amazing guide.
I have a question, though. Fear of heights. Are there any crazy drop-offs or ledges? Something that felt sketchy to you?
I would love to see the park, but I am very affraid of heights.
There was nothing that felt particularly sketchy to me, but I don’t know how those with a fear of heights would view it. At the end of the day you are still climbing a mountain, so heights are always going to be something of a concern I guess. All I can really say is that I’ve been on far worse trails in terms of drop-offs, ledges, etc — these ones didn’t stand out to me in that regard.
Amazing guide! We’re going next May.
Do you know if reservations are required for the hikes mentioned in the post (like Mount Hallasan, for example)?
Thanks in advance
Given I don’t mention Mount Hallasan in the post, this strikes me as a rather strange question.
None of the hikes I actually do mention require a reservation.
Thanks so much for this, I’m headed to Seoraksan this morning and I used this to make my decision about where to stay and which trails to plan for.