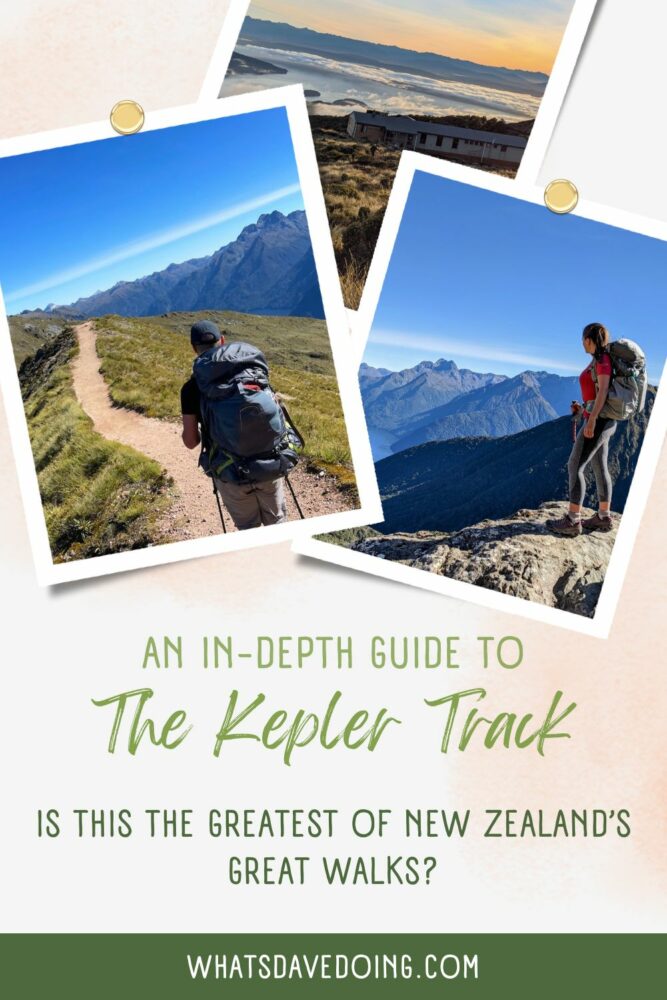
Walking the Kepler Track: An In-Depth Guide
Articles on this site contain affiliate links, meaning I may be compensated if you buy a product or service after clicking them. The full privacy & disclosure policy is here.Fiordland National Park is one of the most rugged, beautiful, and untouched parts of New Zealand, so it’s no surprise that three of the country’s ten Great Walks sit at least partly within its boundaries.
There’s the internationally-famous Milford Track, of course, and half of the Routeburn Track also lies inside the park. Today, though, I’m talking about the third of those wonderful multi-day walks, the Kepler Track.
It’s understandably one of the more popular multi-day hikes in the country, giving locals and international visitors alike the chance to experience some of the best forest and alpine terrain in New Zealand without having to get far into the backcountry to do it.
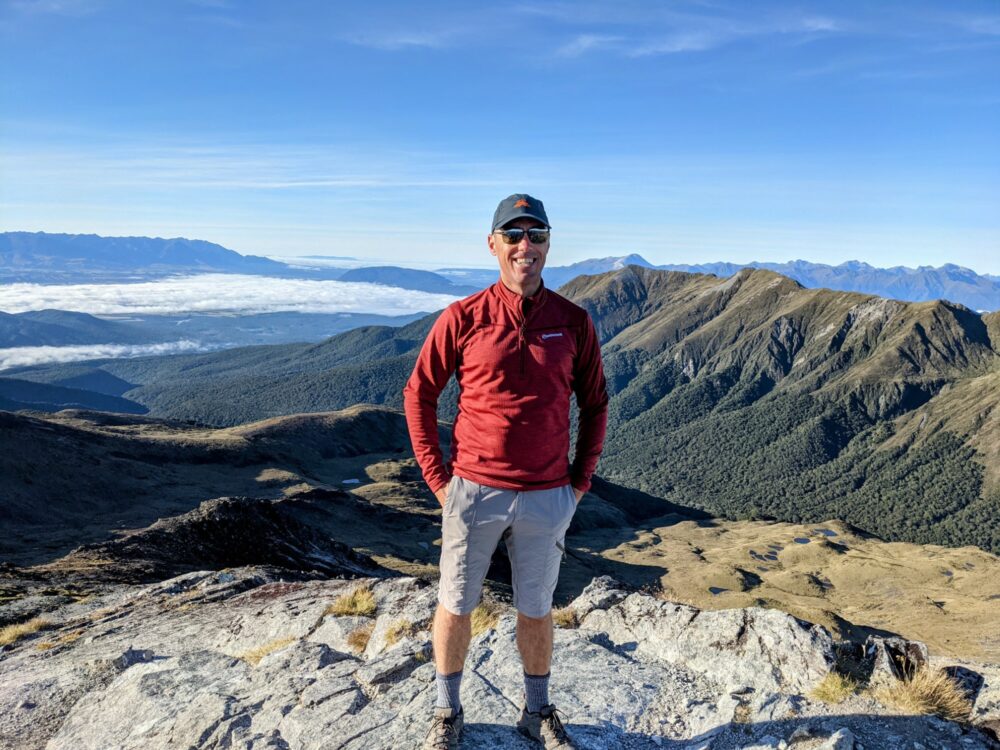
Five years after a cancelled attempt to walk the track due to gale-force winds and heavy rain, I tried again with more success. The weather couldn’t have been more different, and with the sunshine and clear skies came one of the best hikes of my life.
As a result, I figured it was time to put together a guide for anyone else looking to tackle this particularly great Great Walk. I’ve broken it up into two main sections, covering planning and logistics, and the walk itself.
If you’re preparing to walk the Kepler Track and want to know things like how to get to and from the trail, difficulty level, what the huts and campsites are like, the things you need to take, and so on, read the first part.
If you prefer pretty photos, or want a route summary, daily distances, or a blow-by-blow description of the walk, check out the second section. Or just read it all!
Note that we walked the track in summer, staying in huts each night. This guide is largely written with that experience in mind, since that’s when and how most other people walk the track as well.
It’s a different and harder walk if you’re camping, though: there are fewer places to stay, you’re carrying more gear, and you’ll be even more impacted by bad weather. Because of that, I’ve included a specific section below with some thoughts and suggestions for campers.
Where Does It Start and Finish?
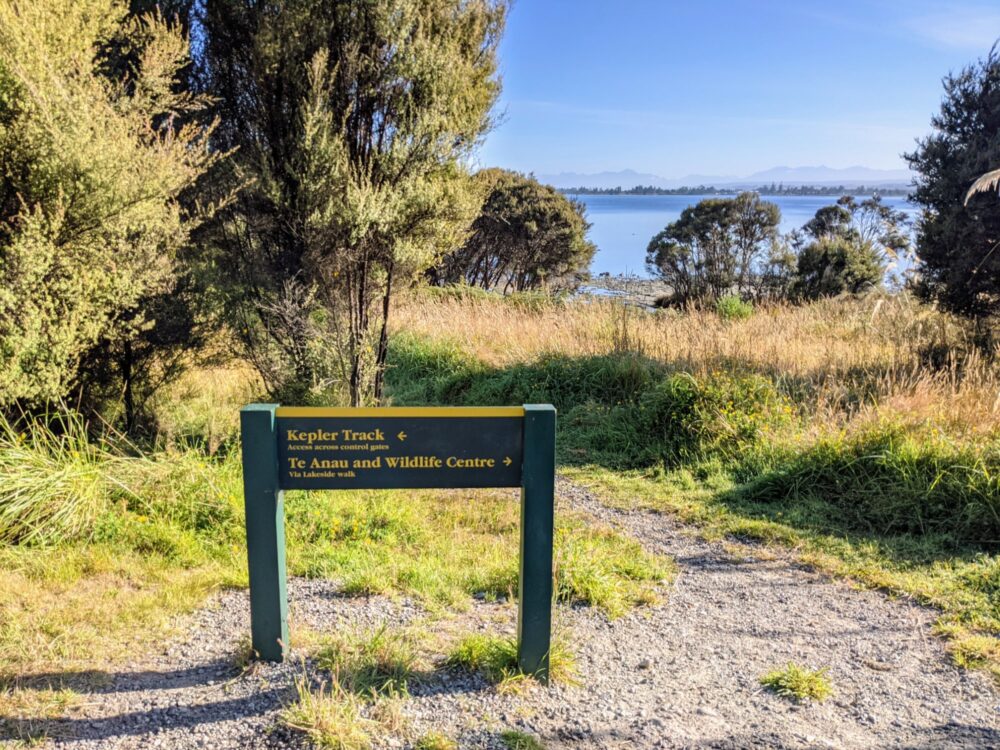
The Kepler Track is a circular route that starts and finishes near Te Anau, the gateway to Fiordland National Park in the southwest of the South Island, and one of my favourite small towns in the country.
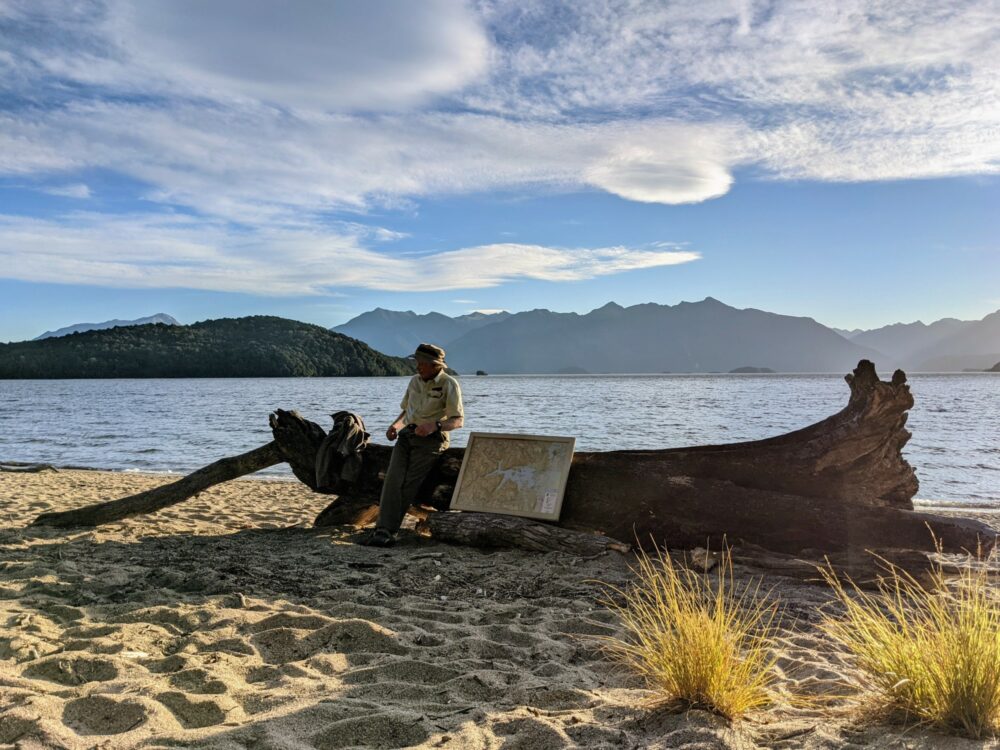
Most people, including us, begin and end at the trailhead beside the control gates at the bottom of Lake Te Anau. There’s also another entrance/exit further south on SH95 at Rainbow Reach, 12km from town beside a dramatic swing bridge over the Waiau River.
We left our car in the free parking lot at the main trailhead, and by the look of it, many other people had done the same. Break-ins are rare there but not unheard of, so don’t leave anything valuable inside if you can avoid it.
There’s a smaller carpark at Rainbow Reach as well, which is more isolated than the one beside the control gates. Again, be careful about what you leave in your vehicle.
How Long Is It?
Despite what the above sign at the start might say, the Kepler Track is 60km long if you walk the full loop. Add another 5km along the lake to and/or from Te Anau if you’re not driving to the trailhead.
Taking the boat across from Te Anau to Brod Bay cuts out 5km, and you can take off a bit under 10km if you get picked up at Rainbow Reach instead of completing the loop back to the Control Gates trailhead.
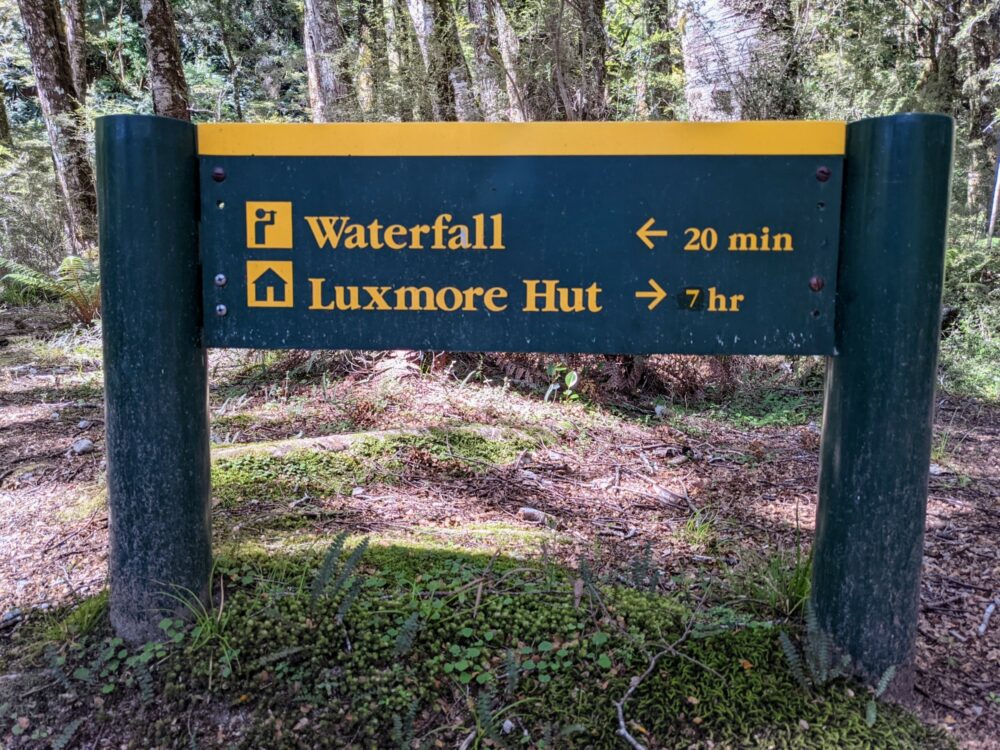
There’s also a side trail up to the summit of Mount Luxmore that’s definitely worth doing if the weather is nice: it adds barely any distance, and has great views. I talk about it in my day two section below.
Which Direction to Walk?
The vast majority of people who walk the Kepler Track do so in an anti-clockwise direction like we did, and one look at the elevation chart shows you why.
The 800m ascent from Brod Bay to Luxmore Hut on the first day is no joke, but the nearly 900m descent from Hanging Valley Shelter to Iris Burn Hut the next day happens over a much shorter distance. If you’ve decided to walk clockwise instead, expect to give your lungs and legs a serious workout when it comes time to climb up it!
Now, that said, if your knees are a bit shot like mine are, you’re not going to love the two-hour descent either. I definitely didn’t, even using hiking poles, and I’m not sure I’d be signing up for it again in a hurry!
The only other reason you might want to consider walking clockwise is if you were arriving late into Te Anau and wanted a short first day: you could park or get dropped off at Rainbow Reach, where it’s only about a 90 minute flat stroll to Moturau Hut.
Given that, I’d suggest planning your direction based as much on whether you prefer uphills or downhills as anything else. Because the alpine terrain is so open and expansive once you’re above the treeline, the views are similarly impressive whichever way you’re walking.
How Hard Is It?
The Department of Conservation (DOC) rates the Kepler Track as an “intermediate” walk, and like a lot of trails in New Zealand, how much you agree with that will likely depend on both your fitness level and the weather!
While most of the trail is at low elevation, don’t underestimate the alpine section: at least 15km of the track sits above the treeline, and is very exposed. Even on a beautiful day like we had, the wind was pretty strong. In bad weather, well, lets just say you’ll be glad to get back into the shelter of the trees!
Most of the track between Luxmore Hut and Hanging Rock Shelter is above 1300m (4265ft), with the highest point being the summit of Mount Luxmore at 1472m (4830ft), assuming you take the short side trip to get there.
If you’re walking anti-clockwise, all of the climbing is done by the time you’ve covered around one-third of the distance. After passing Hanging Valley Shelter on the second day, it’s all downhill: initially very steeply down to Iris Burn Hut, then a gentle slope to Moturau Hut the next day, and basically flat as you walk out to Rainbow Reach or the control gates.
All of that to say, the hardest part of the Kepler Track by far is the section between Brod Bay and Iris Burn Hut: the rest is straightforward, especially in good weather.
Overall, the walk feels like a good mix of conditions: enough tough stuff to make it feel like a challenge, with the payoff of incredible views, but plenty of relatively easy walking where you can relax and enjoy being out in nature.
Given all of that, I think that “intermediate” assessment is pretty fair if you’re walking it over four days and staying in huts. It’s noticeably tougher if you’re camping.
Weather
I grew up in the South Island, and if there’s one thing I know about this part of country, it’s that the weather is unpredictable. While summer is mostly better than winter, that tells you nothing about what any particular day or week will be like.
That’s especially true the further south and west you go, and the higher your altitude, which means that somewhere like the Kepler Track is pretty much ground zero for changeable conditions.
We were, it’s fair to say, absolutely blessed. When even the DOC rangers were telling us that this was the longest stretch of nice days that they could remember, we felt incredibly lucky.
Clear blue skies, warm sunshine, and zero rain over the entire four-day walk is basically unheard of. Other than those gusty winds along the ridgeline on the second day, we genuinely couldn’t have had better weather.
Other people are not so lucky. It’s common to get days of heavy rain on the Kepler at any time of year, very strong winds, and little to no visibility due to being in or above the clouds.
Snow isn’t unusual either, even in summer: there’d apparently been five feet of it just a few weeks earlier. Several inches of rain arrived a couple of days after we finished, which made the weather we got even more of a godsend.
Pay attention to the forecast before you set out, but don’t rely on it: especially in the mountains, it can be wildly inaccurate. Good footwear and rain gear is non-negotiable on this walk!
How Long Does It Take?
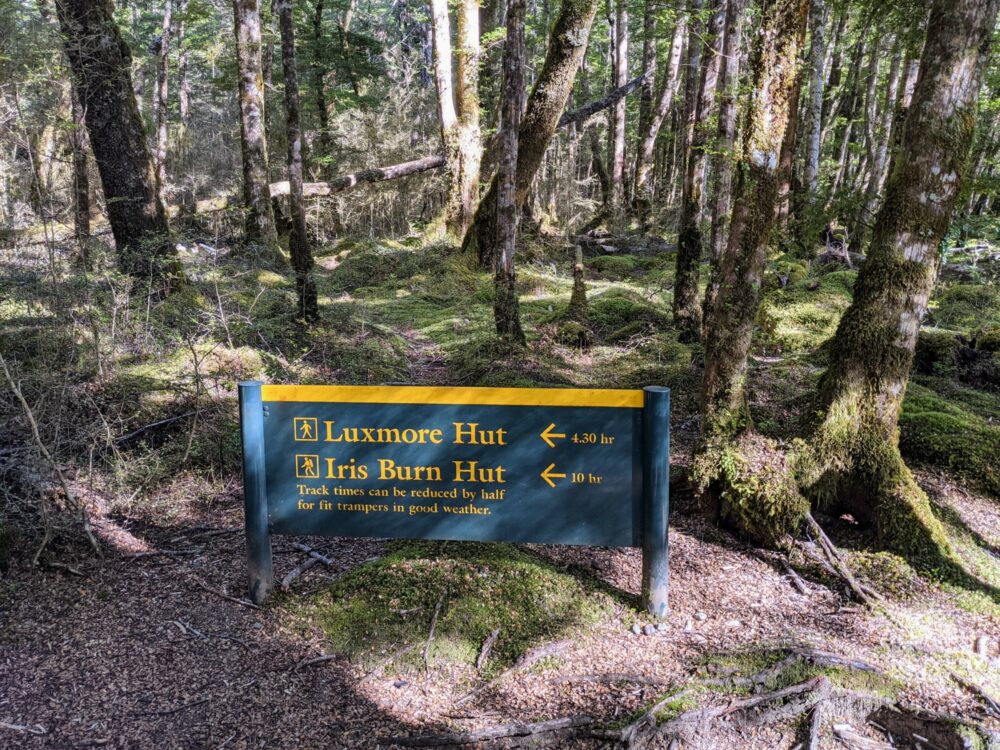
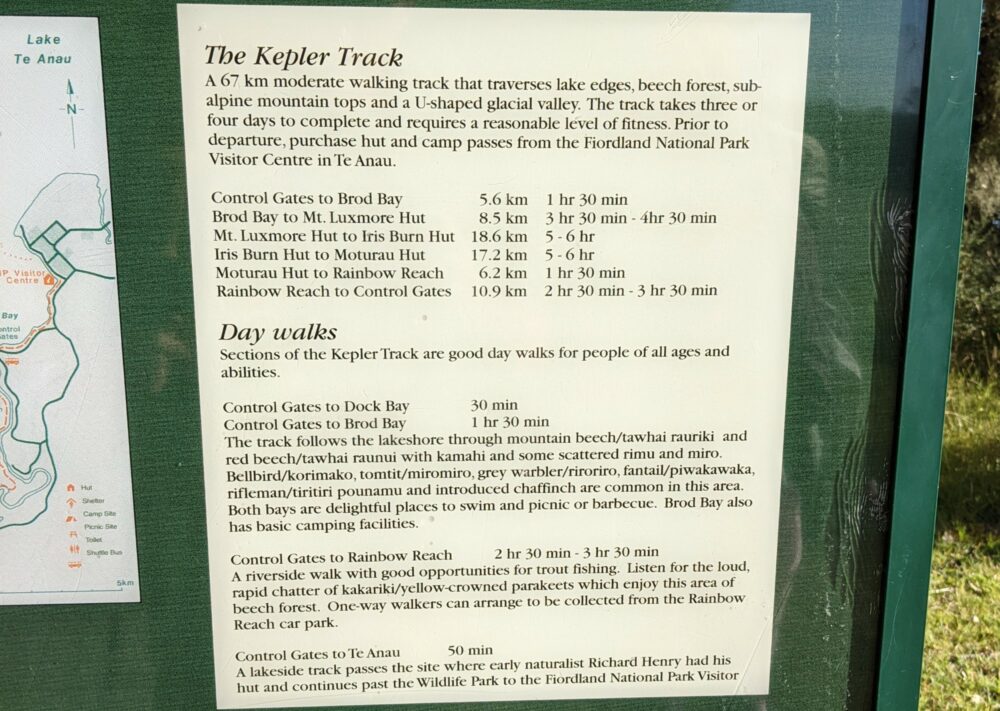
DOC suggests that the Kepler Track requires three or four days to walk, and that’s how long almost everybody takes. We did it over four days: with three huts on the track that are spaced roughly the same distance apart, it seemed to make the most sense.
This gave us plenty of time to cover the distance each day, including any side trails, and allowing for the chance of bad weather.
If you’re fit, motivated, and wanted one less night on the trail, you could easily skip Moturau Hut and walk straight through between Iris Burn and the Rainbow Reach trailhead (or vice versa, if you’re walking the other way).
That’d make for about 22km of reasonably flat walking, taking about 6-7 hours all up: a couple of people we walked with from Iris Burn did exactly that.
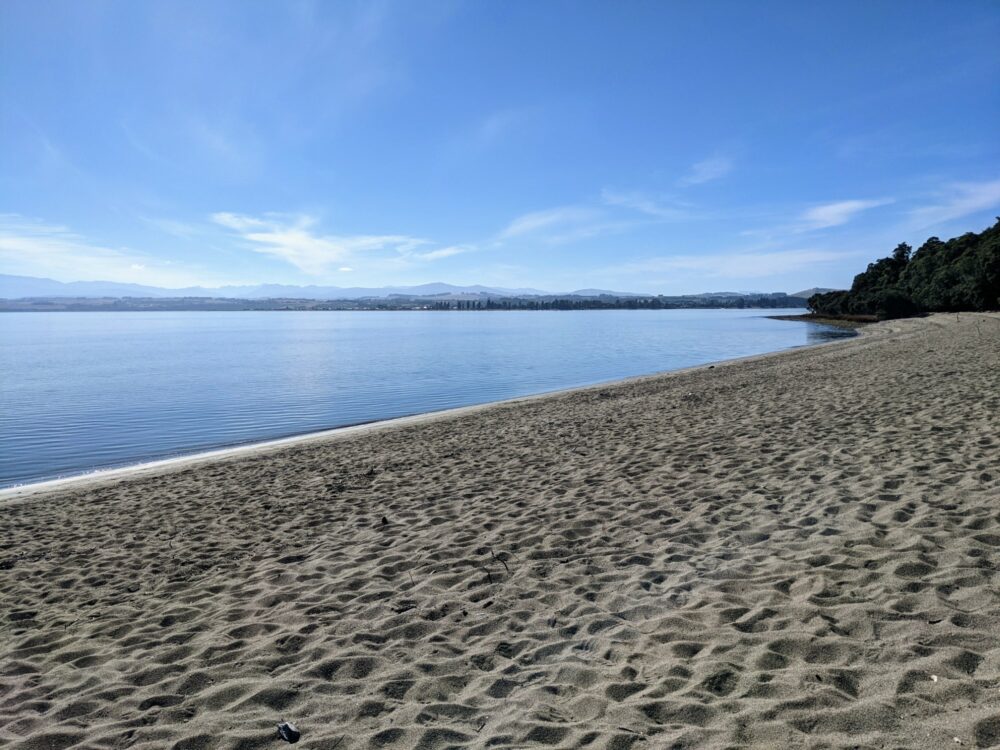
I wouldn’t necessarily recommend it unless you’re short on time, though, just because Moturau Hut is in such a lovely spot. It’s right on the lakefront with its own beach, and our evening spent sitting there listening to the waves and watching the sun set behind the mountains is one of my favourite memories of the walk.
Camping
Everything I’ve written above is assuming that you’re staying in huts each night: if you’re camping, things are a bit different.
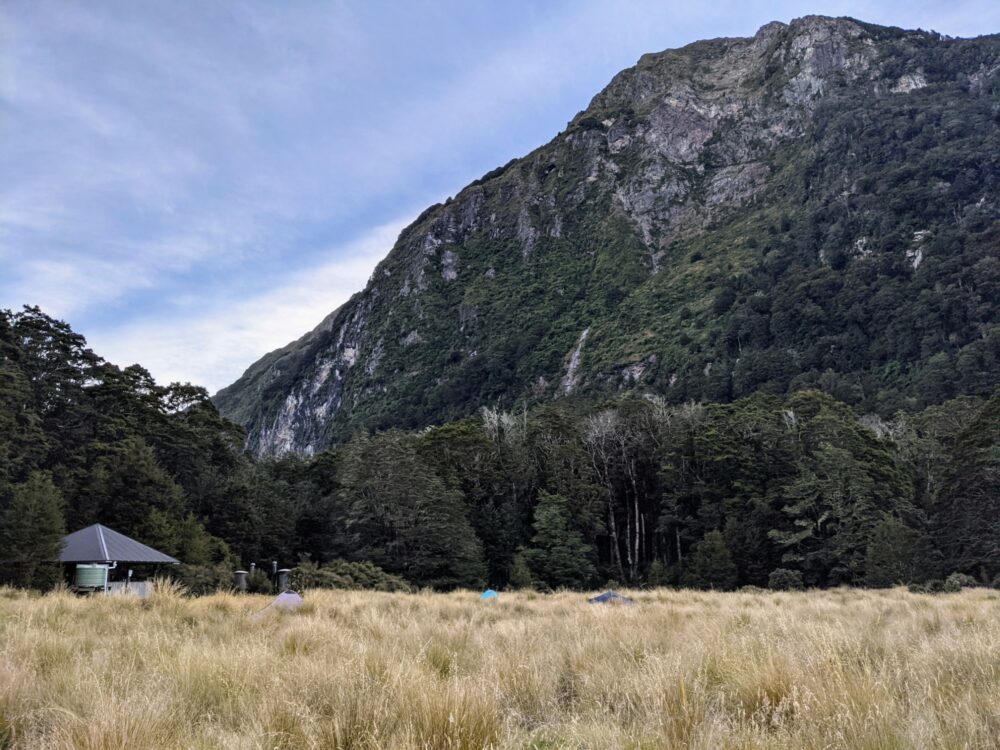
Because you really wouldn’t want to be spending the night in a tent above the treeline in terrible weather, there are only two campsites on the trail, both at lower altitudes. They’re quite far apart: one at Brod Bay, the other at Iris Burn.
That means that you’ll be walking the track over three days rather than four, and no matter which way you’re going, the middle section is going to be hard: around 23km of walking, most of it in exposed conditions, with a big climb at the start and a big descent at the end.
That’s not a small day even in good weather, not helped by the additional weight you’ll be carrying (tent, sleeping mat, etc) versus staying in the huts. It’s far from impossible–we met several people who were doing it–but it does add an extra degree of difficulty.
Because of that, I’d suggest that even if you plan to camp most of the time, see if you can get a booking for one night at Luxmore Hut. Not only is it the best hut on the track, but it breaks up that tough middle day into two much more manageable sections.
If you can’t (or don’t want to) spend a night there, I’d recommend parking or getting dropped off at Rainbow Reach rather than the control gates, and walking anti-clockwise as follows:
- Rainbow Reach ➡️ Control Gates ➡️ Brod Bay campsite (15km, flat)
- Brod Bay campsite ➡️ Iris Burn campsite (23km, anything but flat)
- Iris Burn campsite ➡️ Rainbow Reach (22km, gentle downhill)
In terms of facilities, the campsites are basic but sufficient: both have pit toilets, a shelter to cook in (or hide from the rain), and a water tank. The Iris Burn campsite in the above photo is basically alongside the hut; the one at Brod Bay sits in the trees beside the lake.
I’d suggest setting up under the trees rather than in the meadow at Iris Burn to avoid the worst of the sandflies, and then don’t venture too far: the keas there are notorious for investigating unattended tents. By “investigating”, I mostly mean “ripping holes in”: one unlucky camper I met was patching a large hole with duct tape as I passed.
Getting To and From the Trail
Compared to most of New Zealand’s Great Walks, the Kepler Track is unusually easy to access, because it’s one of the few that start near a good-sized town.
If you don’t have your own transport, buses run every day from Queenstown to Te Anau, and you can easily walk the 5km from the DOC Visitor Centre along the lake to the main trailhead at the control gates.
If you have a car, then either leave it in the Visitor Centre carpark in town, or at whichever trailhead carpark suits. Tracknet runs shuttles between town and both trailheads: they run on a set timetable and need to be prebooked.
Fiordland Outdoors also runs a boat across the lake from Te Anau to Brod Bay ($30pp), cutting out the first ~5km of trail. If you’re planning a day walk up to Luxmore Hut or the summit of Mt Luxmore and back again, it might appeal, but otherwise there’s not a lot of point: that first hour or so is pretty easy and flat anyway.
Accommodation & Hut Bookings
While you don’t have to spend the night in Te Anau before or after your walk, it makes life much easier if you do: it’s at least a 90-minute drive to any larger town, and two hours to Queenstown or Invercargill.
We stayed at Amber Court Motel both nights, and were glad we did. The rooms were large and comfortable, as were the beds, with parking directly outside the door. Most importantly after four days of walking, the showers had good pressure and plenty of hot water!
It’s only a couple of minutes’ walk from the lakefront and DOC visitor centre, and a 15-minute stroll (or two-minute drive) to the main strip of restaurants. If you don’t feel like cooking, there was a kitchenette in each room: I only made coffee in mine, but there was a hob, fridge, and microwave if you’re more motivated than me.
The only thing I would say, though, is that Amber Court is set up for couples and families, and can get quite expensive for solo travellers/hikers. If you’re looking for somewhere cheaper, I’d suggest Te Anau Lakefront Backpackers, where I’ve stayed in the past and was impressed by.
On the track itself, there are three DOC huts, all of which require booking well in advance. The Kepler Track is one of the most popular Great Walks in the country, and the huts are full almost every night during the peak summer season.
If you’ve got specific dates in mind, especially over that busy December/January period, you’ll want to be in front of your computer when bookings open. That’s usually in June each year, announced on the DOC site a few weeks beforehand.
Each hut has similar facilities, although the layout and other details differ. In each one, you can expect to get a mattress on a bunk bed in a dorm-style room, sharing with anything up to 20 people.
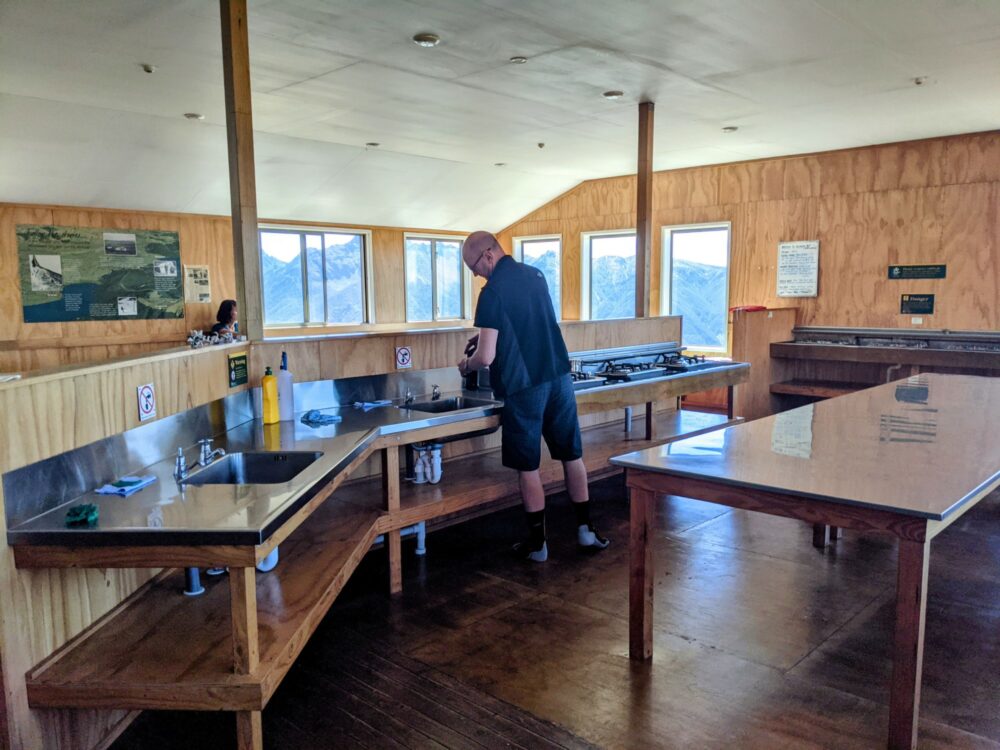
Huts on the Great Walks tend to be some of the best in the country, and the Kepler is no exception: you’ll get gas cooking facilities, basins and a water supply, solar-powered lighting, a wood fire, and even flush toilets.
There’s no power available outside of that lighting, though, and no showers. You’ll need to take your own food, sleeping bag, cooking and eating equipment, and anything else you might need.
In 2024, hut prices per night during the Great Walk season were as follows. For the Kepler Track, this season runs from the Tuesday after Labour weekend in late October through until the end of April.
New Zealand citizens and residents
- Adults: $80
- Children aged 5-17: $40
International visitors
- Adults: $120
- Children aged 5-17: $60
At other times of year, facilities are significantly reduced: pit toilets instead of flush, no gas or other cooking fuel provided, no running water inside the hut, and no rangers present. As a result, prices are much lower, and there’s no distinction between local and overseas hikers.
1 May – late October
- Adults: $25
- Children aged 5-17: $12.50*
* children are free in Luxmore Hut from May 1 to June 30
Campsites need to be booked during the Great Walk season as well, but are cheaper and usually a little easier to secure. Prices for 2024/2025 were as follows:
New Zealand citizens and residents
- Adults: $25
- Children aged 5-17: $12
International visitors
- Adults: $38
- Children aged 5-17: $19
Again, you’ll pay less at other times of year:
1 May – late October
- Adults: $10
- Children aged 5-17: $5
Luxmore Hut
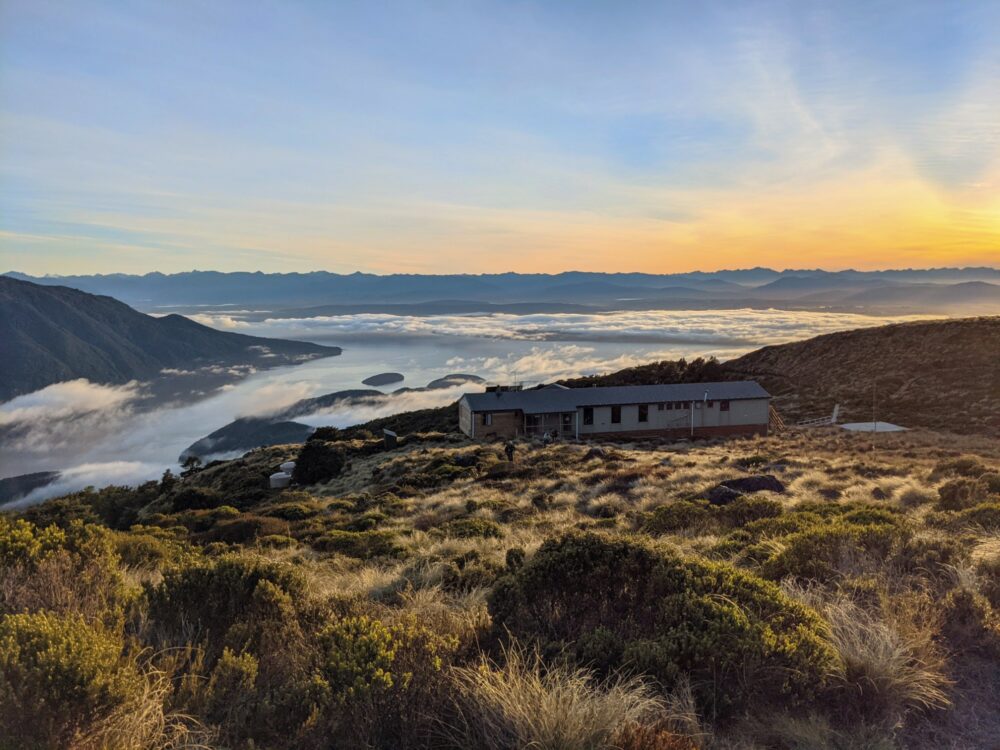
Luxmore was my favourite hut on the Kepler, for all kinds of reasons. Let’s start with the location: who could argue with going to bed and waking up to epic views like that?
The other great thing about being over 1000m above sea level is that you’re out of reach of all but the most determined sandflies. I didn’t see nor feel any while I was there, something I definitely can’t say about either of the other huts on the track!
There’s loads of space to spread out in the main area, plenty of room in the kitchen, and even the bunkrooms weren’t as cramped as others I’ve slept in. The toilets were clean, and everything about the hut felt modern and extremely well looked after.
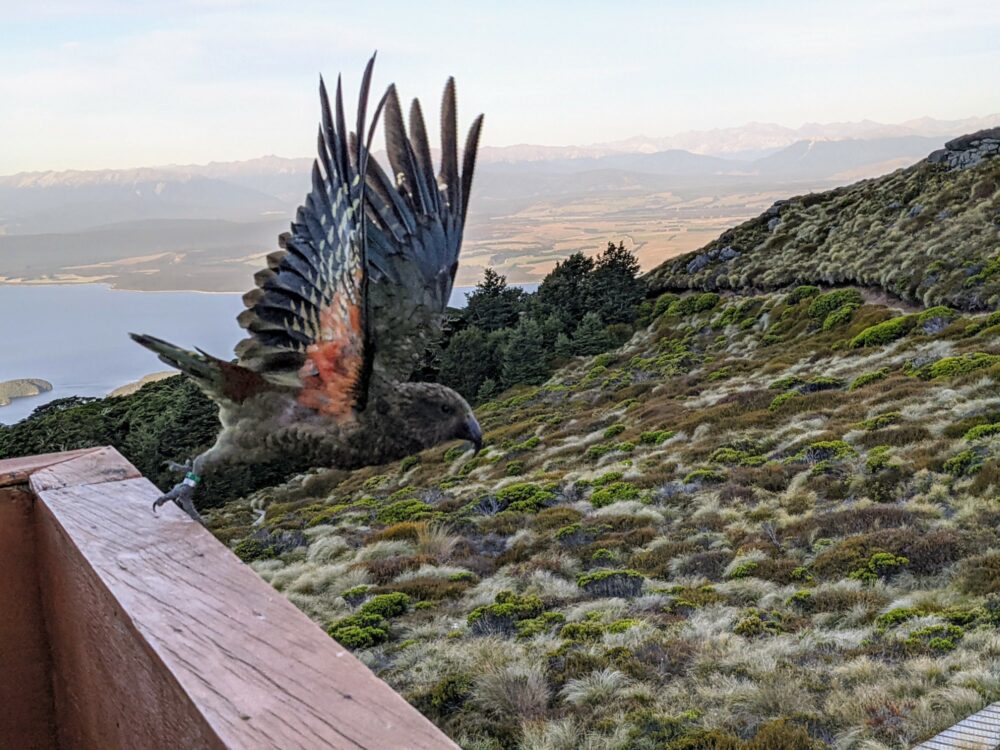
There’s a very high chance of seeing keas here: we had a beautiful one show up who spent several minutes parading up and down the balcony rail a few inches from where I stood. That lasted until it got bored and headed off to peck at the boots of someone who hadn’t heeded the warning to bring them inside!
Tip: if you’ve got any energy left, take the marked side trail from the hut for about 10 minutes to the Luxmore Cave. You’ll definitely need a decent flashlight (phone torches don’t really cut it), but the formations inside are pretty cool and worth the effort.
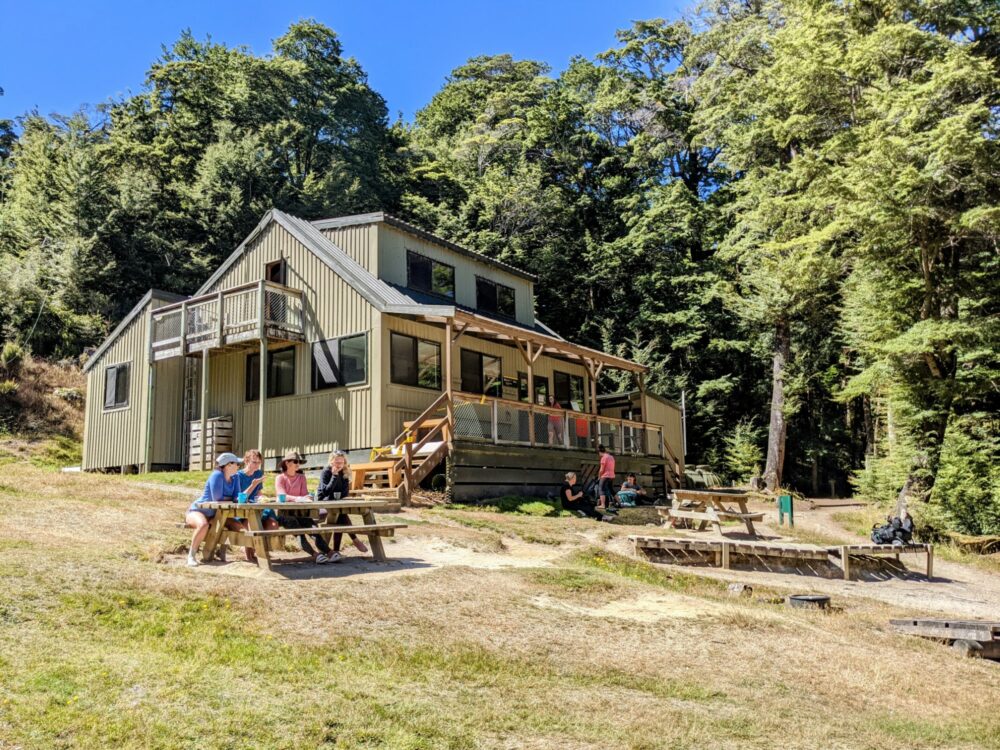
Iris Burn Hut
Set in a meadow surrounded by mountains, I couldn’t have been happier to see Iris Burn hut after a long, painful descent from the ridgeline. It’s a well-maintained hut with plenty of space, although it could do with another toilet given how many people stay there.
Wear plenty of bug spray, especially in the evening or if you’re going for a walk through the meadow to the river. Sandflies are everywhere, even during the day, but I didn’t get bitten inside the hut itself.
There are three separate bunkrooms, not all the same size, so go for the smaller room to try to avoid snorers if you can. I mean, let’s be honest, you’ll likely still have a snorer in there, but there’s a slightly smaller chance.
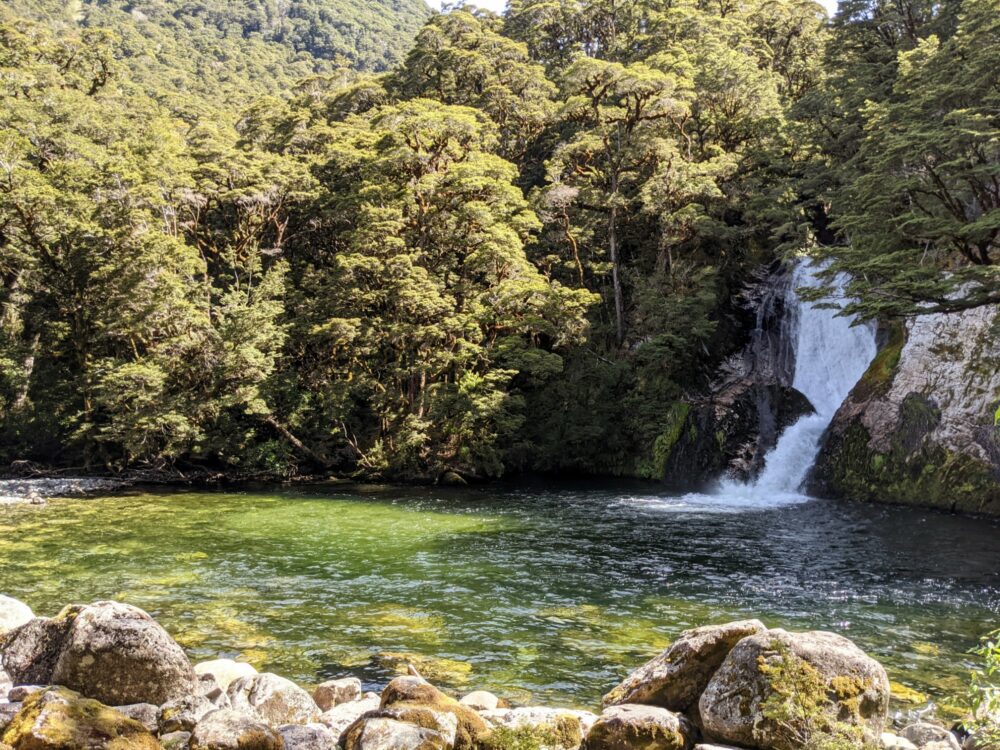
Be sure to head to the nearby waterfall as well: it’s about a 15-20 minute walk along a clearly-marked side track. It’s a great place to soak your feet during the day, and to go kiwi spotting at night. Take a red filter for your flashlight if it doesn’t have one built in, walk slowly, and stay as quiet as possible.
Tip: when taking your boots off at the door, hang them up on the hooks rather than leaving them on the porch to discourage the keas from playing with them!
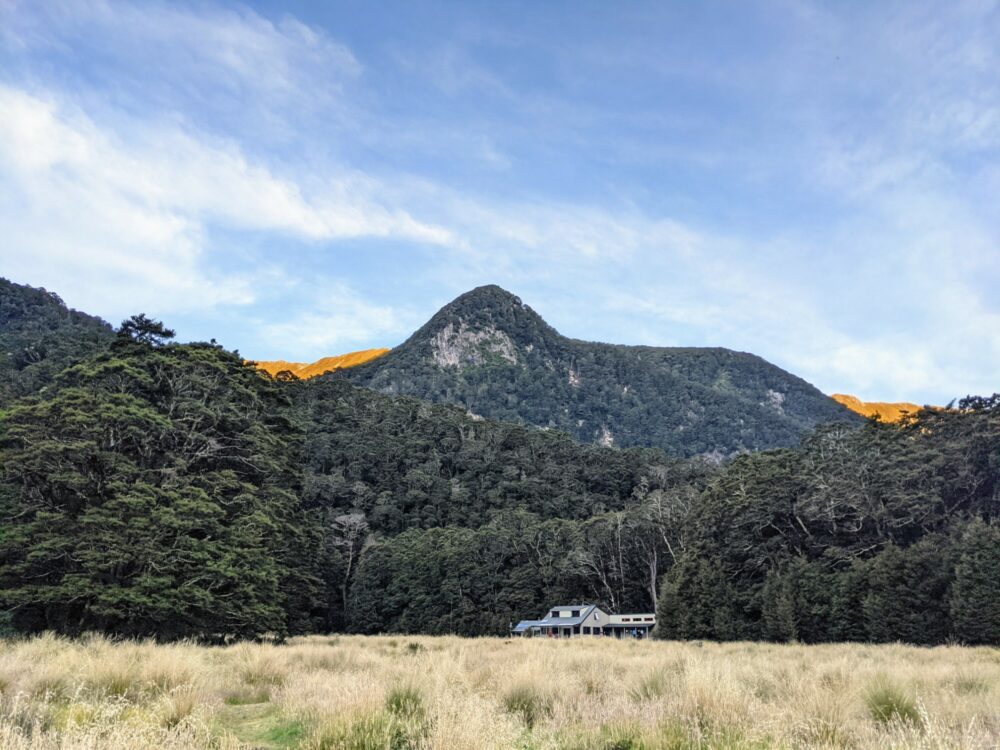
Moturau Hut
Locals call this hut “Club Med”, and it’s not hard to see why. Clean and spacious, it’s set in a clearing on a gentle grassy slope that runs down to a sandy beach on the shores of Lake Manapouri that’s the perfect place to cool off in summer.
It’s a stunning spot with epic views across Shallow Bay towards towering mountains on all sides, including the ones you’re either glad to have finished walking across or worried about tackling!
Keas regularly come and visit: we didn’t see any at the hut itself, but met one a few minutes up the track on the way in.
There are a few picnic tables and wooden platforms dotted around to eat your meals at, even if you’re not staying in the huts that night. If the weather’s nice, though, head down to the beach and pull up a log or patch of sand instead. Just don’t forget the bug spray: sandflies aren’t in short supply here, especially around sunset.
Note that this is one of the few places on the track that you might get some kind of cell service, although don’t rely on it: I had enough to make a quick phone call, but that was it.
Tip: try to get a lower bunk if you can, especially on warm nights: there’s not a lot of airflow in the bunkrooms, and the top bunks get pretty toasty.
Day and Overnight Walks on the Kepler Track
If you don’t have the time or desire to walk the entire track, or you couldn’t secure hut bookings, don’t despair: you can still enjoy much of the Kepler Track as a day walk!
I’ve given a few suggestions, but because all of the routes are out and back, you can always make your own decision about where you’d like to turn around. I talk more about the highlights and difficulty of each section below.
Shorter walks:
- Control Gates to Brod Bay and back: 10km return, flat
- Control Gates to Rainbow Reach: 9.5km one way, flat
- Rainbow Reach to Moturau Hut/Shallow Bay and back: 12km return, flat
- Brod Bay to Luxmore Hut and back (boat to/from Te Anau): 16.4km return, 800m climb/descent
Long walks:
- Control Gates to Luxmore Hut and back: 27.6km return, 830m climb/descent
- Control Gates to Mt Luxmore summit and back: 33km return, 1260m climb/descent
- Control Gates to Moturau Hut/Shallow Bay and back: 31km return, flat
Because both Luxmore and Moturau huts have more beds than Iris Burn, you may find that you can book either of those but not the night you need in the middle to walk the entire track.
If that’s the case for you, or you’d prefer to skip the alpine section, consider booking a night at Luxmore or Moturau and turning one of those longer walks I mention above into an overnight hike instead.
Food and Drink

If you’re wondering what you’ll be eating on the Kepler Track, the answer is simple: whatever’s in your backpack. There’s nowhere to buy food, drinks, or anything else once you’ve left Te Anau, so make sure you’ve got more than enough to see you through.
We took a variety of freeze-dried meals for dinners, and a bag full of protein and chocolate bars, crackers, salami, and cheese for lunch and snacks. Breakfast was generally just a couple of handfuls of scroggin (trail mix) and a coffee from my trusty Minipresso.
We had no problems refilling our water bottles at the huts and campsites along the way. Taps are connected to large water tanks in each spot, either directly at the campsites or piped into the kitchens of the huts. Given the amount of rain that falls here, it’s pretty unlikely that they’ll run dry, but it’s not totally impossible.
There are signs everywhere advising you to boil your water before consuming it: many people don’t bother, including me, but my stomach is not your stomach. If you’re concerned, boil it for at least a minute or take a water filter with you.
You can also choose to refill your bottle from streams at lower altitudes; there aren’t any above the treeline that I remember, at least when I was walking it in summer. Again, you may want to filter or boil it first if you decide to do this.
Dangers and Annoyances
In terms of animals that can kill you, New Zealand is a paradise for hikers: there are no deadly spiders, no snakes, no real predators, and even the mosquitos and ticks don’t carry any nasty diseases. Bliss.
As far as animals are concerned, the only two that are likely to give you any concern on the Kepler Track are sandflies and keas, New Zealand’s beautiful alpine parrot. I love these smart, inquisitive birds, but like I mentioned earlier, their curiosity can be an issue.
They’ll happily peck at unattended backpacks and tents, especially if there’s anything shiny to attract their attention, and even fly away with small, interesting items. Even your car may not be safe: they regularly pull out the rubber seals from around the windows of vehicles left in mountain carparks!
Just keep an eye out for them, and don’t leave things that you value outdoors and unattended, especially if you can’t see them from where you are. Note that keas are absolutely protected by law: don’t try to touch or hurt them in any way.
Sandflies definitely aren’t protected: they’re far more common than keas, and honestly, far more annoying. These biting little ******* aren’t much of a problem on the alpine parts of the walk, but they’ll definitely find you elsewhere, especially when the sun starts to set.
If you’d prefer not to spend the rest of your hike scratching yourself, put on long sleeves, pants (trousers), socks and shoes towards the end of the day, keep moving around, and apply insect repellent to any exposed skin.
Dark colours are better than light ones, and there’s some evidence to suggest that high levels of B vitamins make you less attractive to them. No harm in grabbing a tube of Berocca from the supermarket before you set out, I guess.
Other than that, the biggest risks to your health and happiness are likely to come from the weather. Torrential rain, howling wind, beating sunshine: they’re all a distinct possibility, often on the same day.
Use plenty of SPF 50+ sunscreen, even on overcast days: the sun in New Zealand is brutal, especially at altitude. Wear a hat, have proper rain protection, and be careful on exposed ridgelines when it’s windy: it’s a very long way down.
Kepler Track: Day by Day
Below is a daily description of the experience Lauren and I had on the Kepler Track in late summer. We had unbelievable weather, an amazing experience, and no injuries or other problems to speak of.
The times I’ve listed below were how long it took us to walk each section, not including any food or rest breaks. These were at the low end of the range given in the DoC brochure: the alpine section on the first two days would have taken a lot longer if we’d been doing it in the rain!
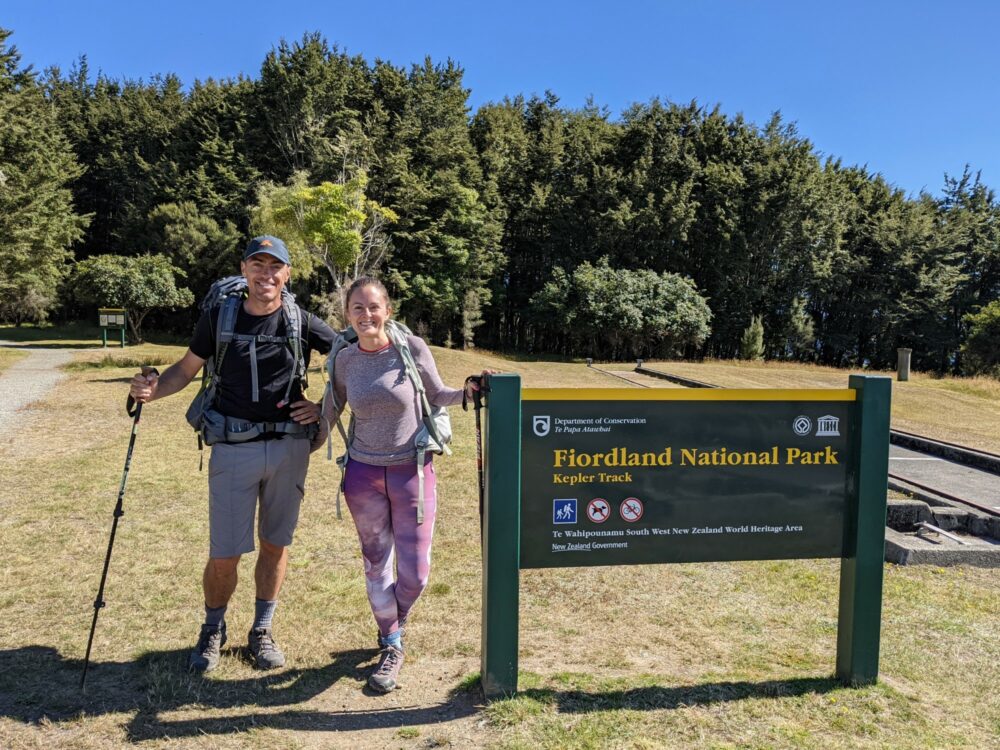
Day 1: Control Gates to Luxmore Hut
After an early start and the largest breakfast we could fit inside ourselves at Sandfly Cafe, we drove the 5km out of Te Anau and parked up near the control gates. Signs for the Kepler Track pointed down a wide gravel path, and just like that we were off into the forest.
The first hour alongside the lake was deceptively flat and easy: with the sun filtering through the beech forest and native birds singing cheerfully from the canopy, it was an idyllic scene all the way to Brod Bay.
We stopped there for a few minutes to admire the view back towards Te Anau, inhale a protein bar, wander along the coarse sand beach, and appreciate the last bit of flat ground we’d see for the rest of the day.
And then the uphill began.
We climbed a solid 800m over the next 2.5 hours, mostly through the forest until we finally broke through the treeline towards the end. I wouldn’t say the gradient was all that steep–it’s a bit over 8km from Brod Bay to Luxmore Hut–but it was certainly persistent.
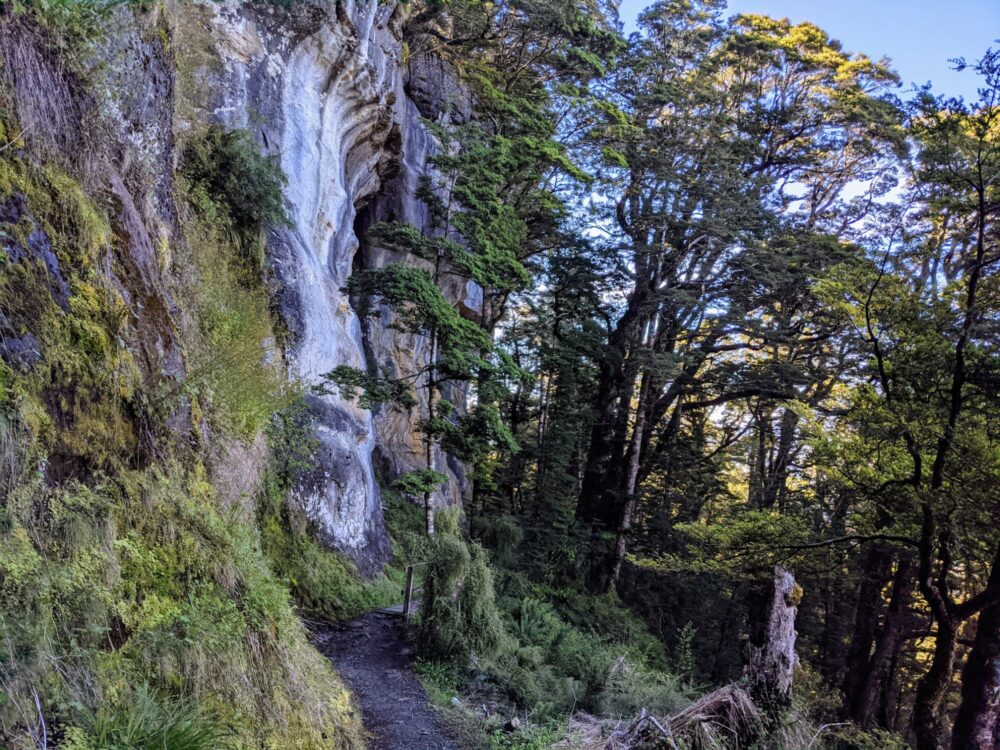
Shaded and sheltered by the forest, we’d had little in the way of views as we climbed up the switchbacks. That didn’t mean there was nothing to look at, at least if you’re a fan of ferns and steep limestone cliffs like I am, but it was quite a shock when we turned a random corner and, without warning, had what felt like half the country laid out in front of us.
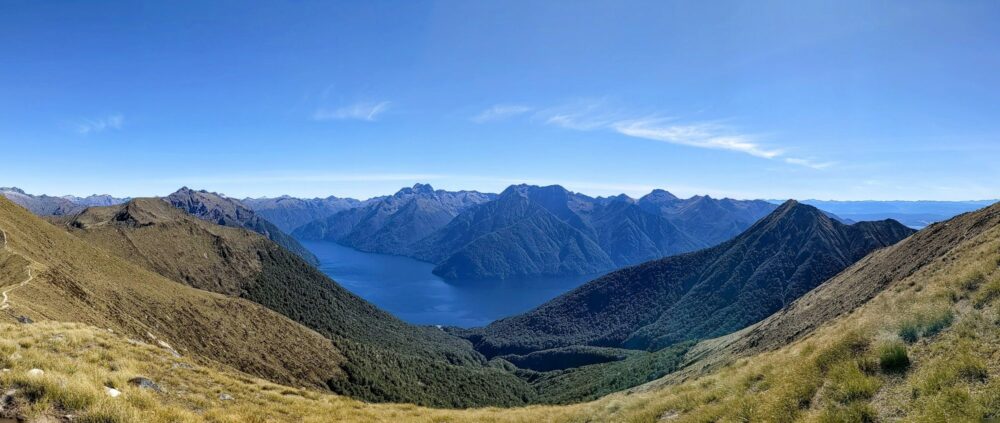
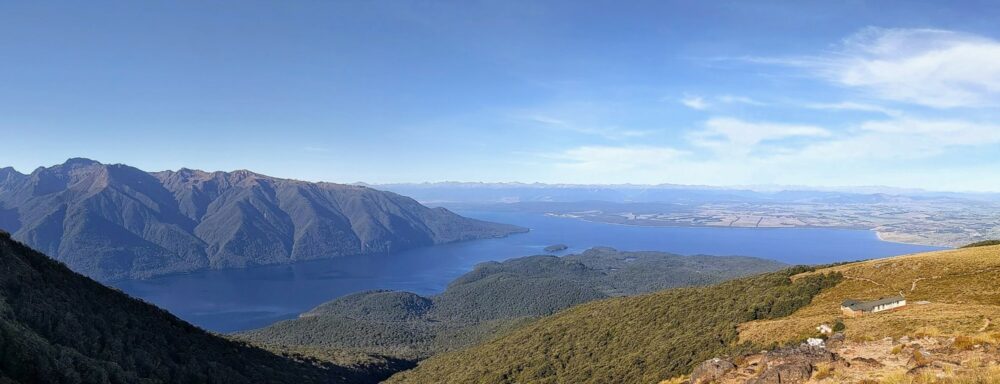
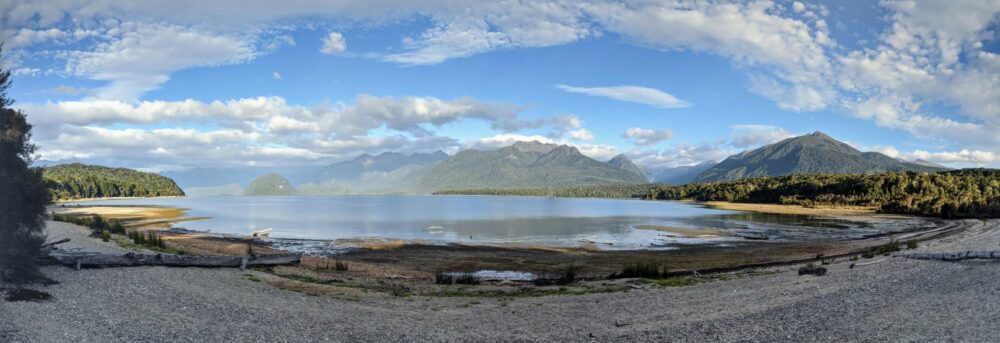
Lake Te Anau stretched into the distance as far as we could see, which was a very long way: there was barely a cloud in the sky. It’s the largest body of fresh water (by volume) in all of Australasia, and at that moment, it looked like it.
The track, which had been damp and a bit muddy in places, became dusty and dry in an instant, and even started to flatten out. It’s a miracle! With a newfound spring in our step, we almost skipped the last half hour to Luxmore Hut, the views improving the whole time.
We arrived just after 1pm, leaving us plenty of time to kick off our shoes, eat a leisurely lunch, and laze around in the sunshine for a couple of hours reading our books and steadfastly refusing to walk a single step further. Eventually, though, that amazing landscape got the better of us, and we headed out for a bit more exploring.
First up, the Luxmore Cave, which is about 10 minutes from the hut along an obvious (and signposted) trail. It didn’t look like much from the outside but goes a long way back: we didn’t explore all of it due to only having our phone torches, but even the formations in the first “room” were well worth the effort.
Later that afternoon, the hut warden led a group of us up the trail on a nature walk, explaining seemingly every plant, rock, and tiny insect along the way. I can only dream of having that level of knowledge about the natural world.
That took about an hour, and we spent at least that long afterwards seeking out very slightly different viewpoints to take even more photos of that incredible view. Eventually returning to the hut for dinner, the night’s entertainment was provided by card games, hiker chat, and of course that delightful kea I mentioned earlier!
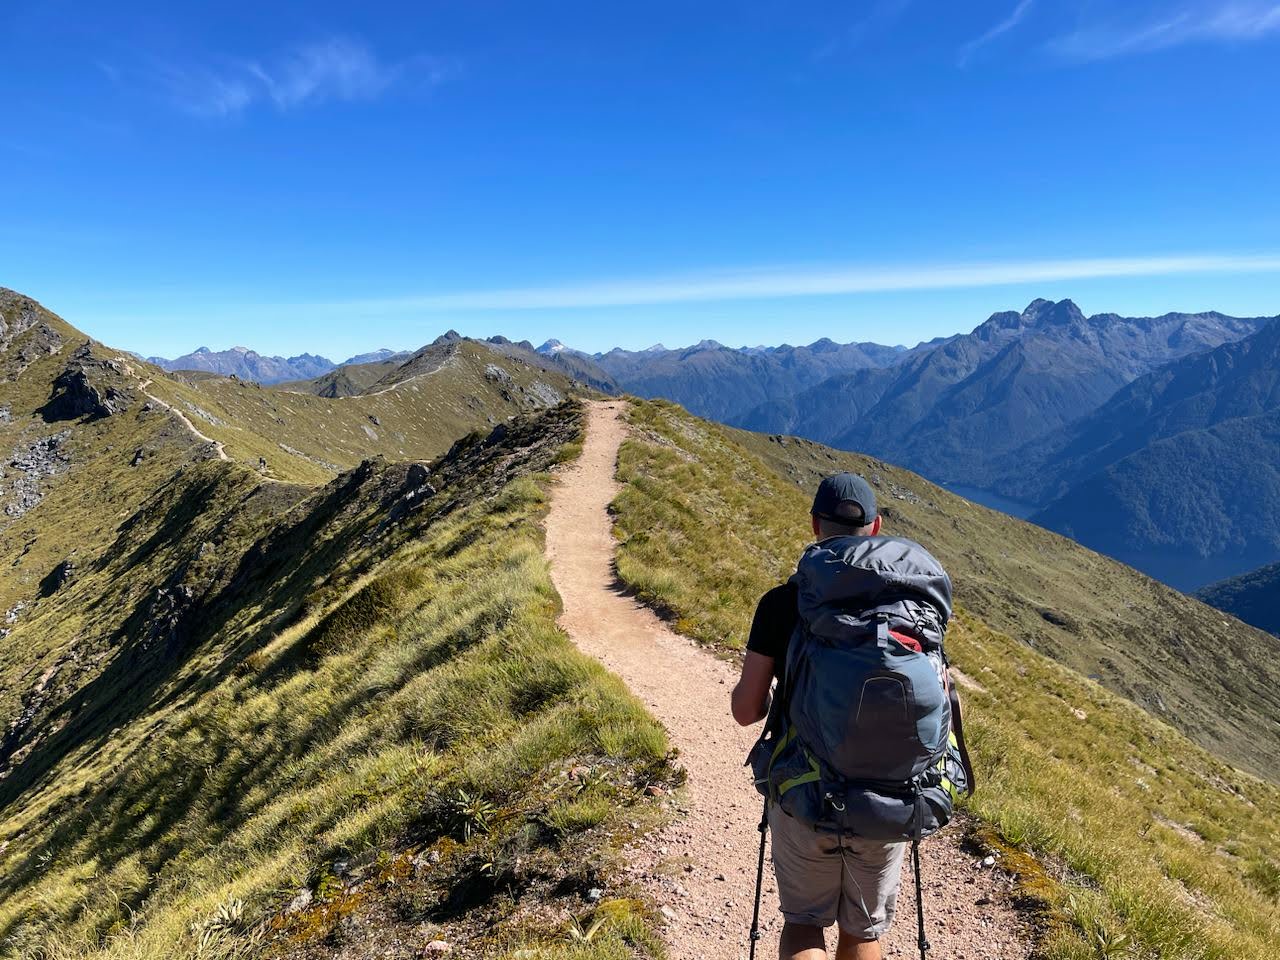
Day 2: Luxmore Hut to Iris Burn Hut
After a restful night of listening to snorers, we were up bright and early for breakfast and a dawn coffee on the balcony. Cloud blanketed the valley below, and the sun was barely peeking over the mountains as we grabbed our packs and walked out the door at 7:30am.
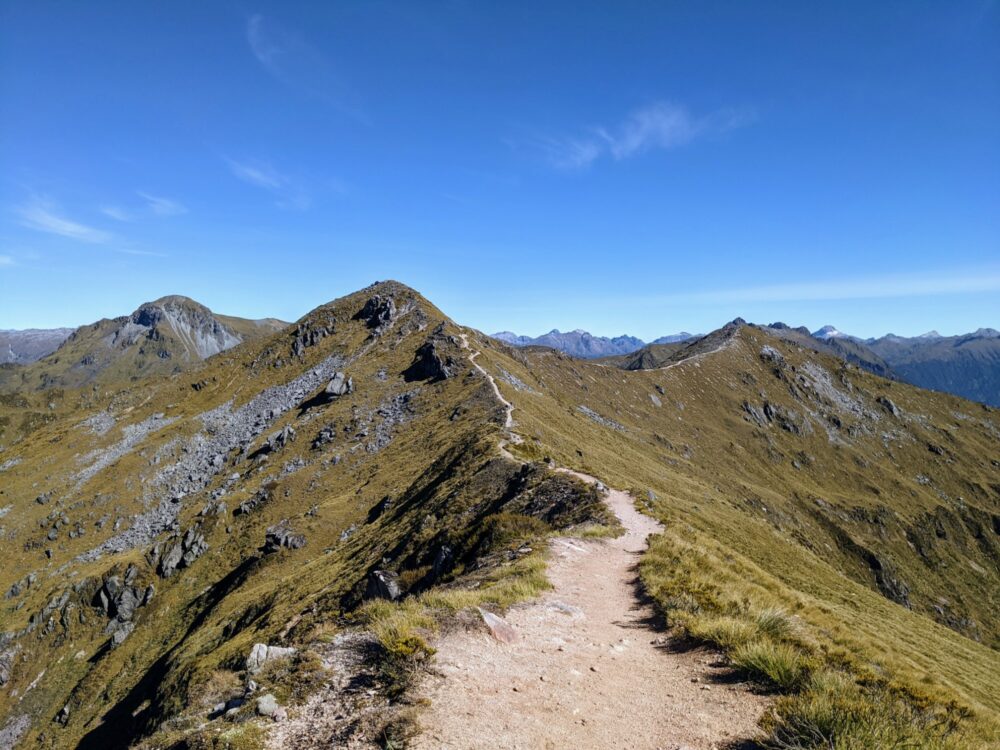
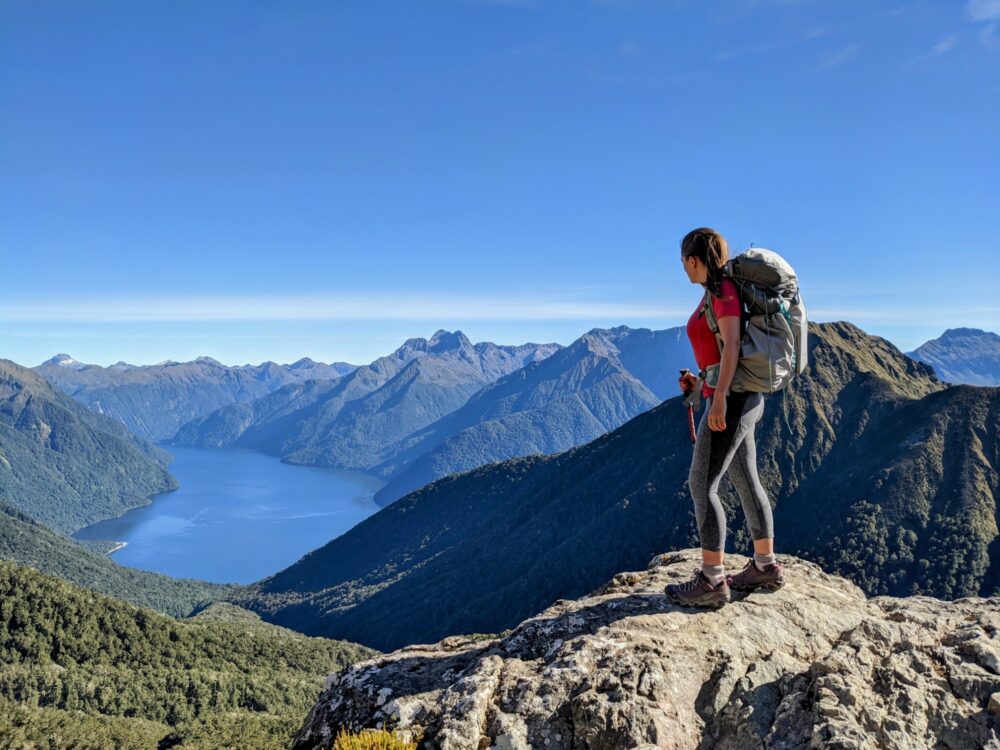
With most of the day spent on a jagged ridgeline high above the trees, there was the promise of unbelievable views if the weather played its part.
And, of course, it did. The clouds in the valley started to break up soon after we started walking, and while they lingered for a while behind us, the view ahead was soon nothing but clear blue skies.
A brisk wind whipping along the ridgeline kept the temperature down, but even so, I was shedding layers regularly. That may have had something to do with the 300m ascent in the first 90 minutes, as we made our way towards the side trail up to the summit of Mount Luxmore.
This is the highest point on the track, a short but steep little 100m climb that’s easy enough in good weather but probably not something I’d tackle in the rain. It’d be pretty slippery, and chances are you’d see nothing at the top anyway.
I, on the other hand, saw quite a lot.
With the wind having switched from “brisk” to “howling” on this exposed section, Lauren had volunteered to stay at the trail junction, enjoying the shelter of the rocks as she kept watch over a pile of backpacks left there by people heading to the top: it’s apparently a happy hunting ground for curious keas!
The trail continued along the sharp ridgeline towards Forest Burn Shelter, over huge gashes in the mountainside left behind by avalanches after heavy rain. I’ll admit we sped up a bit over those sections: there seemed little risk of rockfall today, but I wasn’t about to hang around and test that theory.
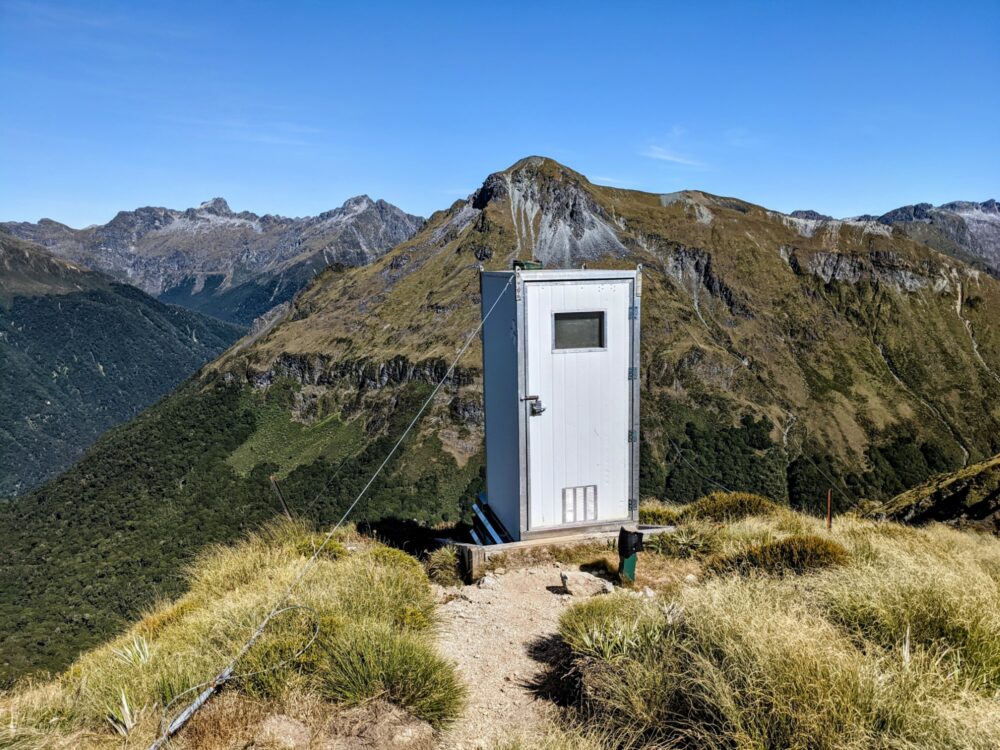
That shelter is one of two on this part of the track, intended to give those walking in terrible weather some respite from the wind and rain. For us, they were just a convenient place for lunch, with perhaps the most epic toilet view in the country.
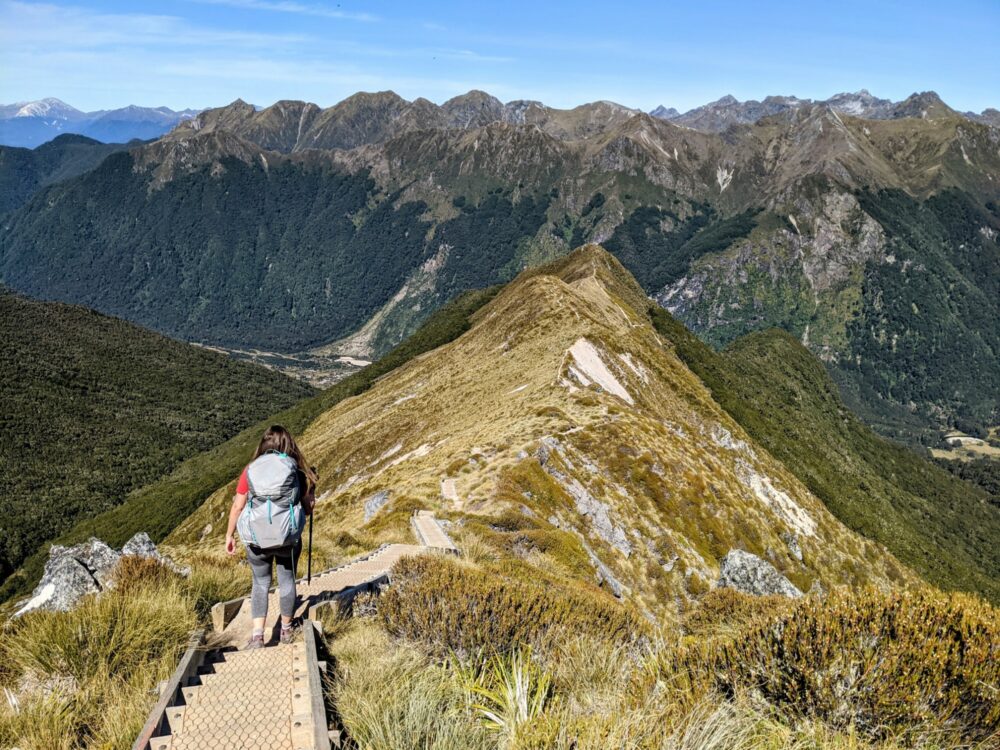
The section between the Mt Luxmore summit and Hanging Valley Shelter had been comparatively flat, giving us the better part of two hours of relatively easy walking from one amazing viewpoint to the next. That all changed within minutes of packing away our food bag, however: it was all, quite literally, downhill from there.
The DOC brochure for the Kepler Track makes no specific mention of the nearly 900m descent from Hanging Valley to Iris Burn, but I can guarantee that everyone in the hut that night who’s just done it definitely will.
As lovely as the views were, the walk down was pretty brutal, the first half a 2km staircase back to the treeline, the second a series of endless switchbacks through the forest. I’ve long thought that downhill is harder than uphill, and my knees, toes, and hips didn’t change their mind about that today.
It took almost two hours to stumble the roughly 5km down to the hut, and even the appearance of both kea and kākā (another fantastic New Zealand parrot) towards the end wasn’t enough to distract my complaining feet. Let’s just say I’ve never been happier to see a sandfly-infested tussock meadow in my life than I was that afternoon!
If you’d told me when I arrived that we’d end up walking the side trail to the waterfall not once but twice that day, I’d probably have laughed in your face, but that’s exactly what we ended up doing.
The first time was soon after we arrived, to snap a few photos and soak our aching feet in the water. The second time was all thanks to the DOC ranger on duty, who did a great job of convincing us that we needed to head back at dusk to try and spot one of the kiwis that regularly hang out there.
We spent about an hour out there, but despite spending several minutes standing in the dark convincing ourselves that a nearby stick leaning on a rock was, without doubt, New Zealand’s most famous native bird, we didn’t end up seeing or hearing any kiwis that night.
Well, other than the human variety snoring in the bunks beside us. We definitely found those without any trouble.
Day 3: Iris Burn Hut to Moturau Hut

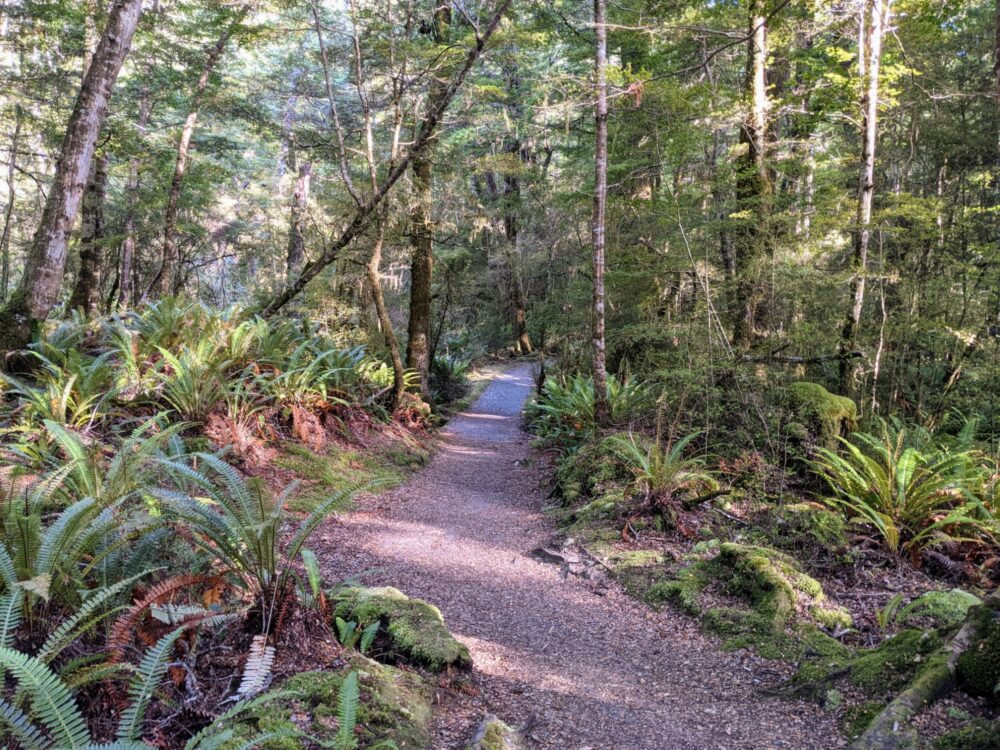
Even though the distance was a bit longer than the day before, today’s walking was much easier. With the alpine section behind us, we had only a gentle descent through old-growth forest on another beautiful sunny day. The views disappeared, of course, but it sure was nice to give my knees a rest.
The hut we’d stayed at the night before gets its name from the small Iris Burn river that feeds the nearby waterfall, and the track ran parallel to it the entire day. It was usually too far away to see or hear, but we drew near now and then, its gentle burble making an already tranquil scene somehow even more relaxing.
The kea and kākā of the previous days had disappeared, replaced by smaller birds like pīwakawaka (fantails) and South Island robins. I didn’t mind, I love all native birds equally. Except for the chonky kererū, which will always take top place on my list due to its sheer ridiculousness.
With the first hour spent among the trees, it was a surprise to suddenly walk out into a large, open area. A vast landslide had ripped through here after heavy rain in 1986, tearing up the trees and rocks in a kilometre-wide swathe of destruction. I know I go on about the weather in this part of the country, but this really bought it home.

The small Rocky Point shelter lay a little further ahead, and was a good place to stop for a drink and a snack. We’d set a much faster pace today and were already past the halfway mark, so had plenty of time to sit, eat, and slap away at the occasional sandfly.
The second half of the day’s walk was even prettier than the first, with large fields of ferns and a mix of dirt/gravel trail through the drier sections and wooden boardwalk through the wetter and more delicate areas.
At this point we met a couple of doctors from Bristol who were walking the track on their days off, and got to talking about the differences between hiking in the UK (where we’d all been living a year earlier), and New Zealand where we were all based now.
The remaining miles slipped by even faster as we chatted, and before we knew it we emerged onto the shores of Lake Manapouri. The second of the two lakes on the Kepler, it’s the second-deepest in the country, and easily one of the most beautiful.
Moturau Hut and its lovely beach were only a few minutes away, and where we were staying for the night. After sharing lunch with the doctors, they said their goodbyes (they were walking out to the trailhead at Rainbow Reach that afternoon), and we headed for a brisk dip in the lake and an afternoon of reading books on the beach.
The ranger was one of those gems you often find looking after DOC huts in New Zealand: friendly, incredibly knowledgeable about the area, and absolutely dedicated to preserving this beautiful part of country.
He took everyone who was interested down to the lakefront in the evening, delivering an hour-long talk on everything from local wildlife to the “Save Manapouri” campaign in the early 70’s.
It was the country’s first mass environmental movement, successfully halting plans to destroy these beautiful surroundings by raising lake levels up to 30m to supply a hydro power station.
Sitting there on the sand, watching the sun set behind the mountains as waves lapped gently onto the beach, I was very grateful to those who’d had the foresight to lead that protest half a century earlier.
Day 4: Moturau Hut to Control Gates
We’d planned a leisurely start on our final morning, knowing that the walk out to the control gates would be as flat as a pancake the whole way. Apparently “leisurely” still meant “on the path by 8 a.m.”, but it was the closest we’d had to a lie-in so far.
The first half-hour of walking felt much the same as the day before, strolling through the forest alongside Lake Manapouri before the track takes a hard left at the far end of Shallow Bay.
There’s one final chance for a dip in the lake here, although we’d have had to wade for a while: with the tide out, the bay was very much living up to its name.
Forgoing the optional 10-minute detour to a basic, small DOC hut further along the beach, we followed the main path, where the trees gave way to grassy wetlands almost immediately.
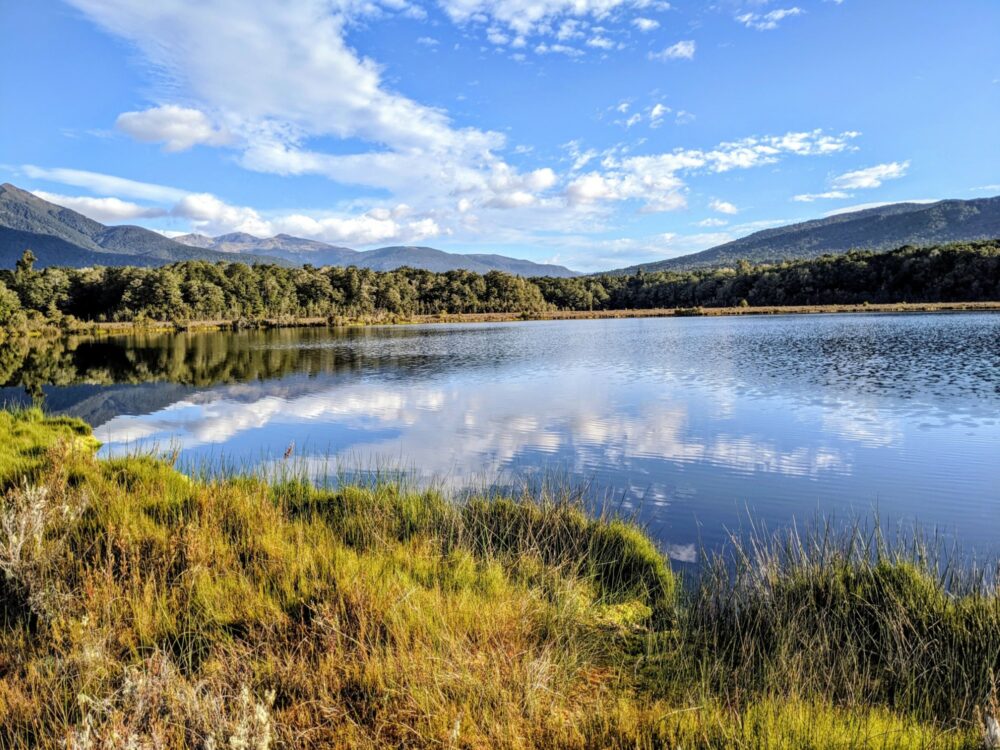
About halfway along the short wetland section sits Spirit Lake, which was doing an amazing job of reflecting the nearby trees and mountains on this near-windless sunny morning. DOC has helpfully built a viewing platform just off the track, so if you’ve got equally good weather, it’s well worth stopping for a few (dozen) photos!
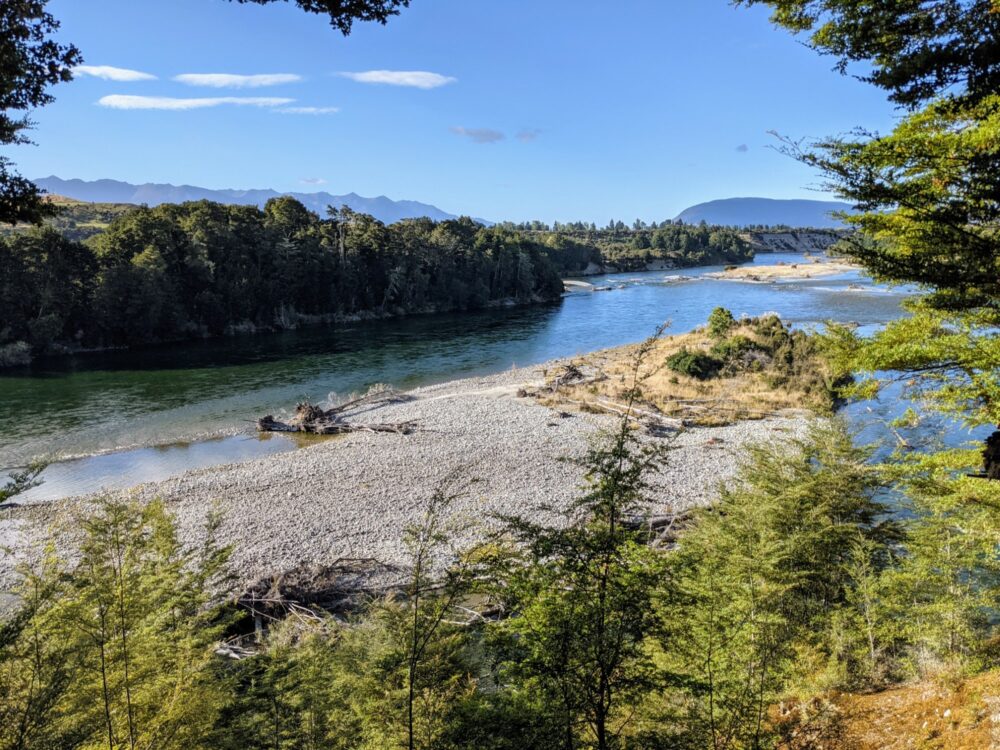
The path soon headed back into the forest, and from there it was under an hour to the sign pointing off to the long swing bridge over the river to Rainbow Reach. We stopped for a quick snack and to take a few photos of the river, but since we weren’t finishing here, it was soon time to carry on.
The final 10km section from Rainbow Reach to the control gates is probably the most manicured part of the track: wide and well-maintained, it’s a popular spot, and we met several locals and day hikers coming the other way.
The path here is dead-flat, hugging the river almost the entire way back to the trailhead. We were absolutely flying by this stage, the promise of a hot shower and a meal that didn’t consist of crackers and salami or freeze-dried curry spurring us on to cover the distance in under two hours.
Before we knew it we’d broken out of the trees and screeched to a smiling, sweaty halt beside the wooden signpost where we’d posed for photos four days earlier. If you’d told us then that we’d have nothing but blue skies and sunshine for our entire hike, I wouldn’t have believed a word of it, and yet that’s exactly what we’d had.
I’ve done a lot of walking in my homeland over the years, in some of the most beautiful parts of the country, and yet at that moment, it was very hard to think of a better, more-rewarding hike than the Kepler. If you get weather like we did, I strongly suspect you’ll be saying the same.
So there you have it, my guide to walking one of the greatest of New Zealand’s Great Walks. If I left anything out or you’ve got any questions about the Kepler Track, just leave them in the comments and I’ll do my best to answer them!